
Basics
Table of Contents
Camera Controls
Scrolling
- use the map scroll keys (default: WASD)
- you can configure this under Settings / Hotkeys / Scroll tactical view
- you can also use edge scrolling
- you can configure this under Settings / Misc. / Camera controls
- when selecting a unit via their unit panel (or F1-F6), the camera will automatically center on the unit (by default)
- you can configure this under Settings / Gameplay / Miscellaneous
Zooming
- zoom in/out with the mouse wheel
- you can also use numeric +/- to zoom
- press numeric * to reset the zoom level to default
- there's a minimum and a maximum zoom level
Turn Mechanics
General Rules
Gameplay is divided into Turns. Players always take turns in a predefined order, which is as follows:
- Human Player #1
- Human Player #2 (if playing 1+1 Squads mode or Parallel squad turns in Single Mission mode is set to off)
- Additional human player #3 & #4 (in Single Mission, if any)
- The Alien Horde (AI)
During their own turn, players may act with all their units without any restrictions on unit order, selection, movement, attacking, etc., as long as their units have enough Action Points.
A player may also choose to end their turn at any time. It is NOT mandatory to spend all (or any) APs.
Before the first player's Turn, status effects (burning, etc.) are applied to static objects–don't stand next to a burning barrel!
At the start of the Aliens' Turn, active Nests may grow and produce eggs. Eggs may hatch if they've been provoked or have matured. Alien reinforcements may arrive from open service tunnels or the edges of the map (on the surface)
Additional Rules / Details
At the start of a player's turn, before actual control is given to them, specific rules and status effects (if any) are applied to all of their units in squad order. The exact order of the effects is as follows:
- if they are standing in a poisonous environment, poison buildup is applied.
- available Action Points are reset to the maximum.
- if they have any items that have a persistent effect (like the Rubber Ducky giving Morale), the effect is applied in the item inventory order
- non-item-based regeneration (if any) is applied (see regenerating aliens)
- if they are standing in an area effect (fire, for example), it is applied as if they were stepping in it (again).
- bleeding is applied (and the bleeding amount is then reduced by 1).
- cloaking amount (if any) is reduced.
- all the “elemental” (damage type based) effects are applied in the following order:
- AP loss from knockback in the last turn
- tranquilization
- burning (fire)
- acid
- poison
- freezing (cryo)
- shadow energy
- Morale is increased (if applicable)
- a Morale check is made to see if the unit panics or goes berserk. If it does, the effect is concluded before the next unit is evaluated.
Extracting Units (Exfil)
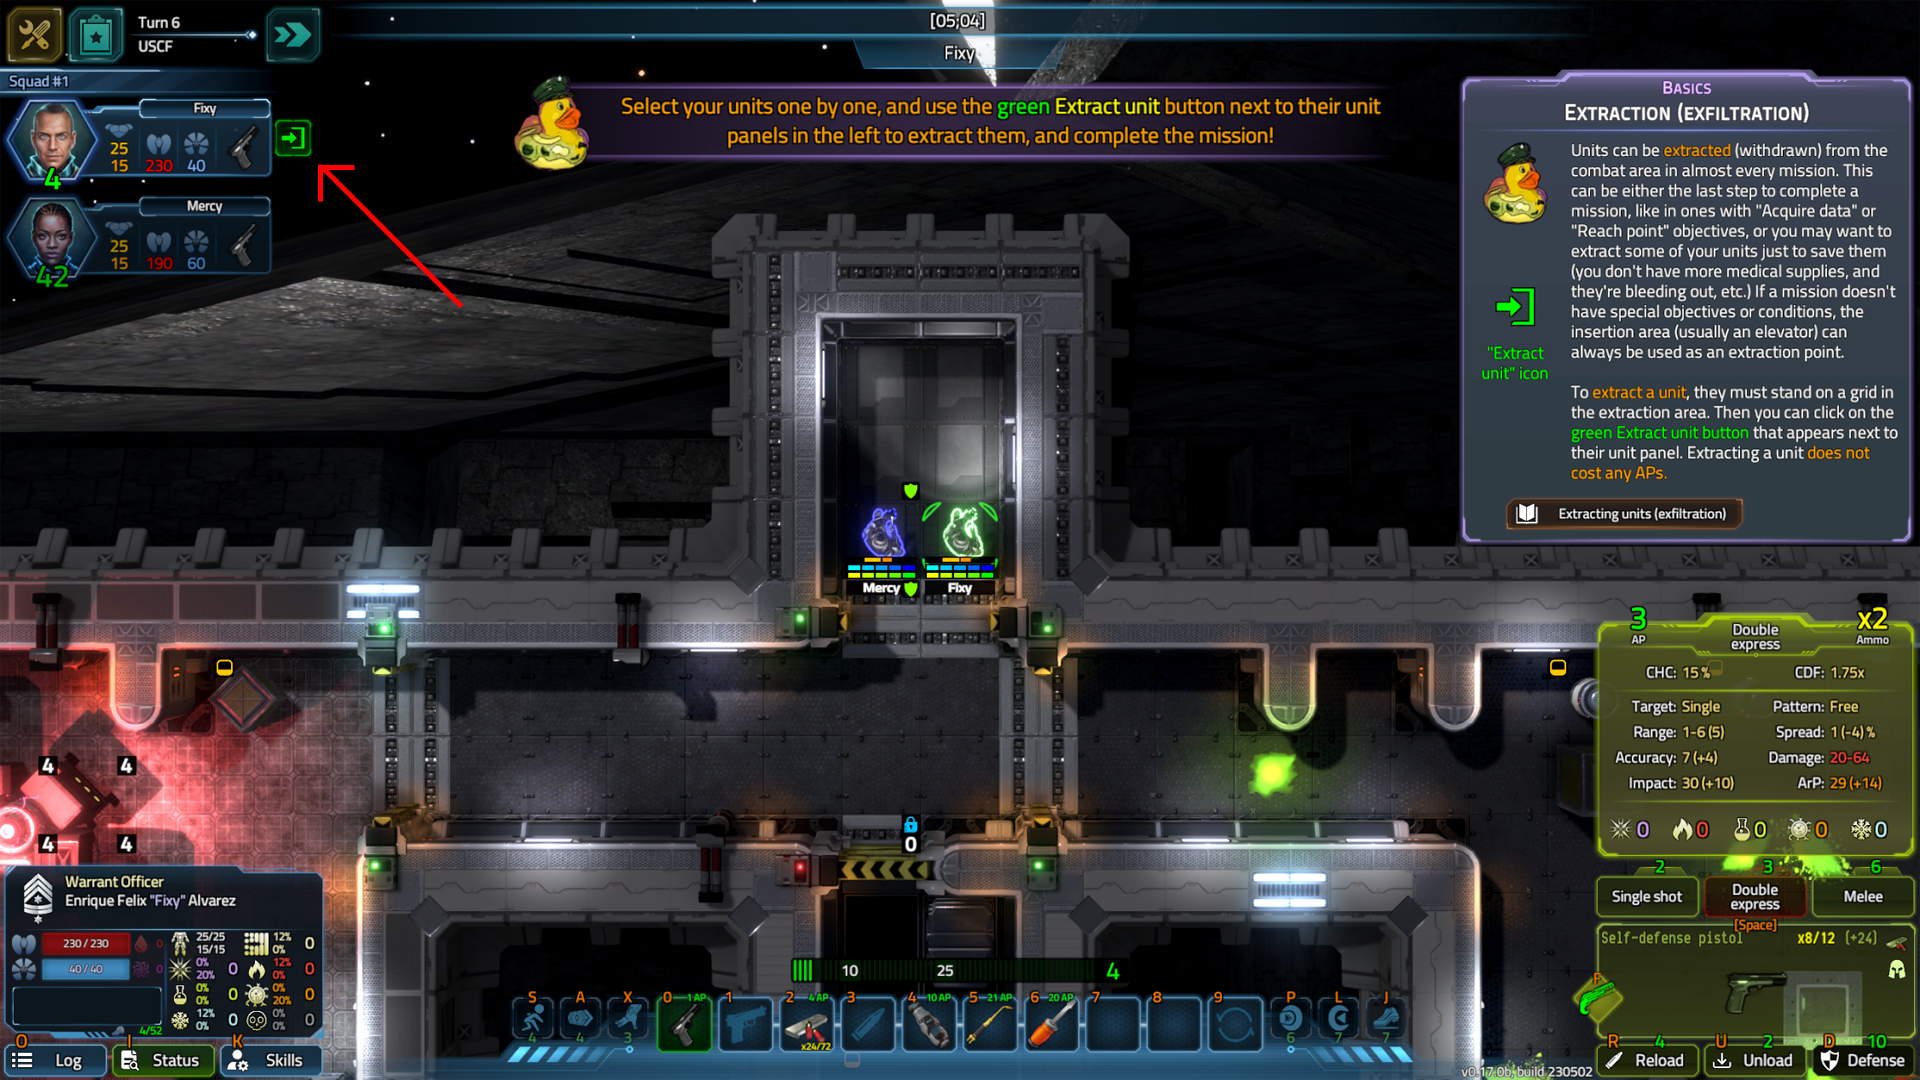
When a unit stands in an insertion or extraction area, and the situation allows (see later), you can use the green “Extract unit” button to extract the unit for no Action Point cost.
An insertion area is where you start the mission; in most cases, it is an elevator or a designated part of the map. Unless you're specifically instructed to, extracting a unit through the ingress point won't contribute to mission completion, and will remove them from your active squad for the remainder of a multi-mission Operation. However, they won't count as a casualty.
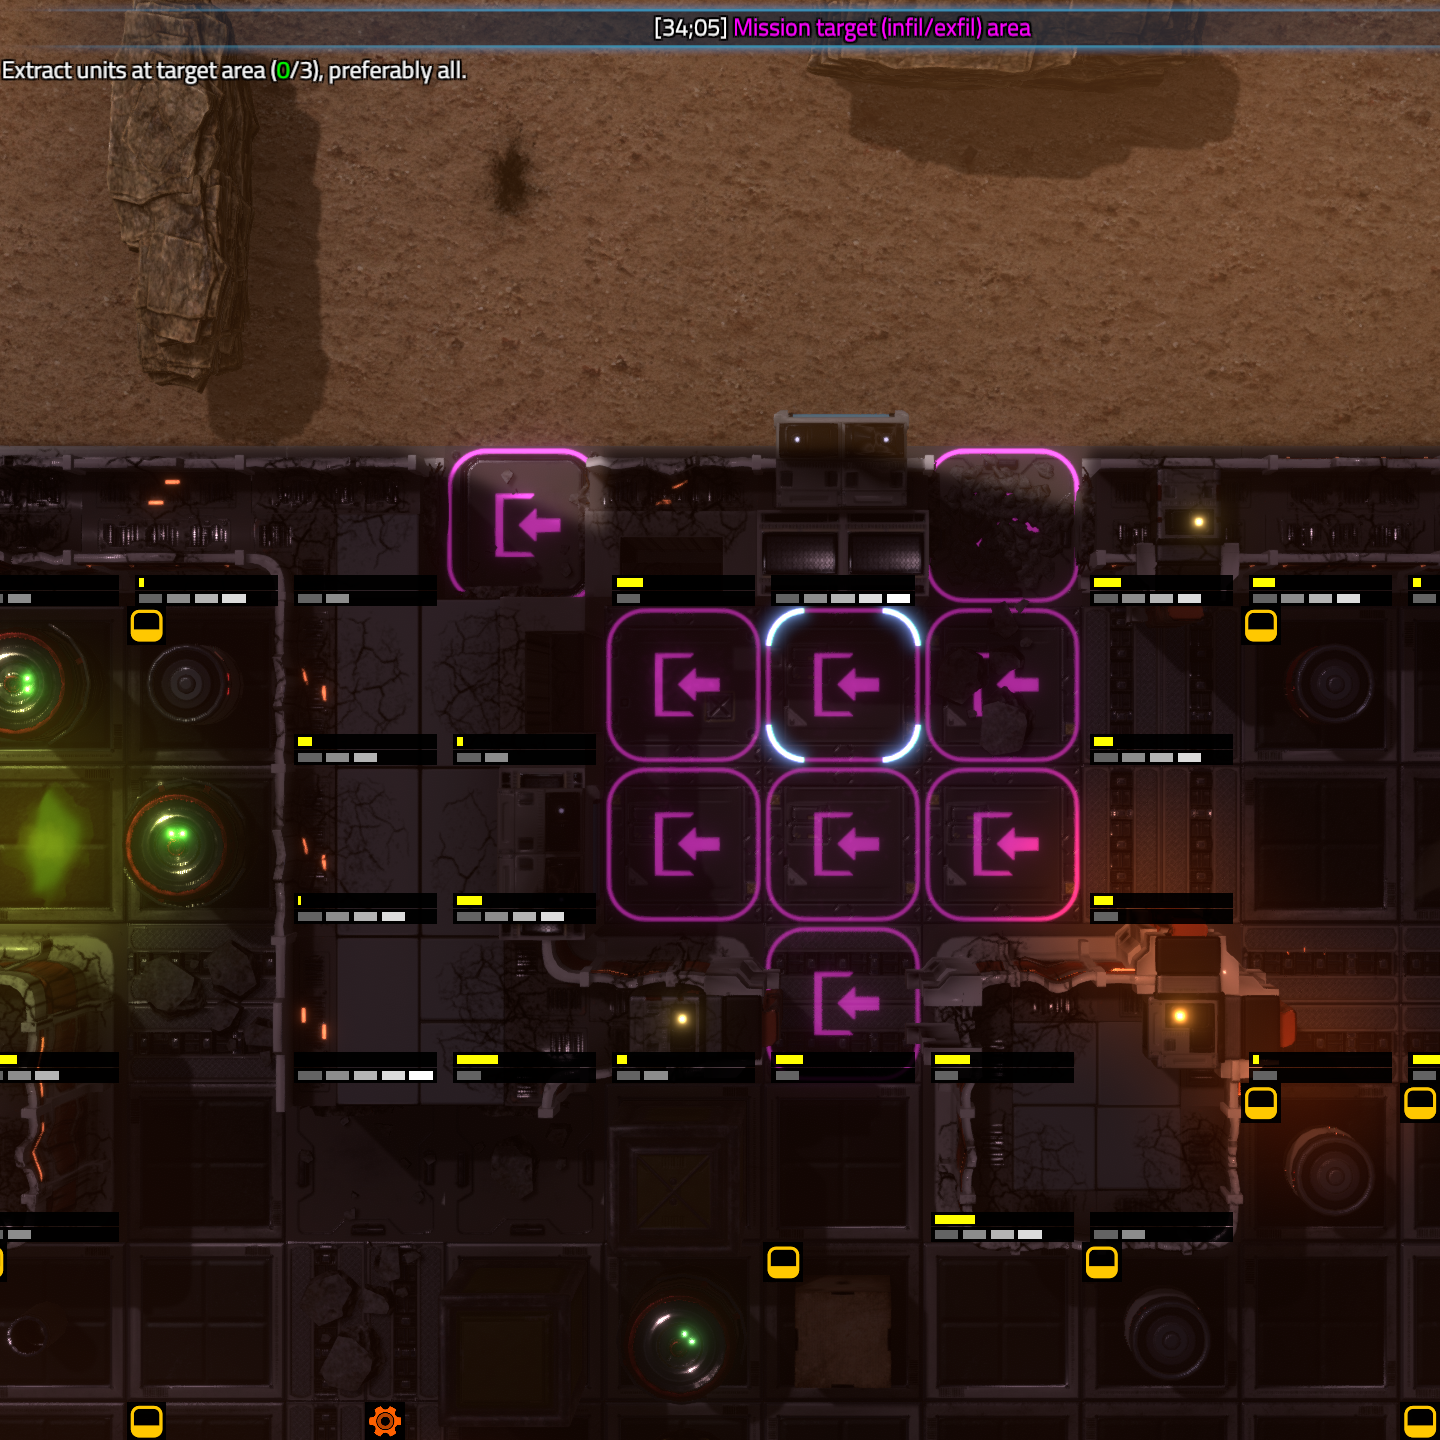
An extraction area is where you have to go to complete a mission (if that's the objective). This is often the case in some tasks during multi-mission Operations and by definition for the “Reach extraction point” objective in Single Mission mode.
Squads & Units
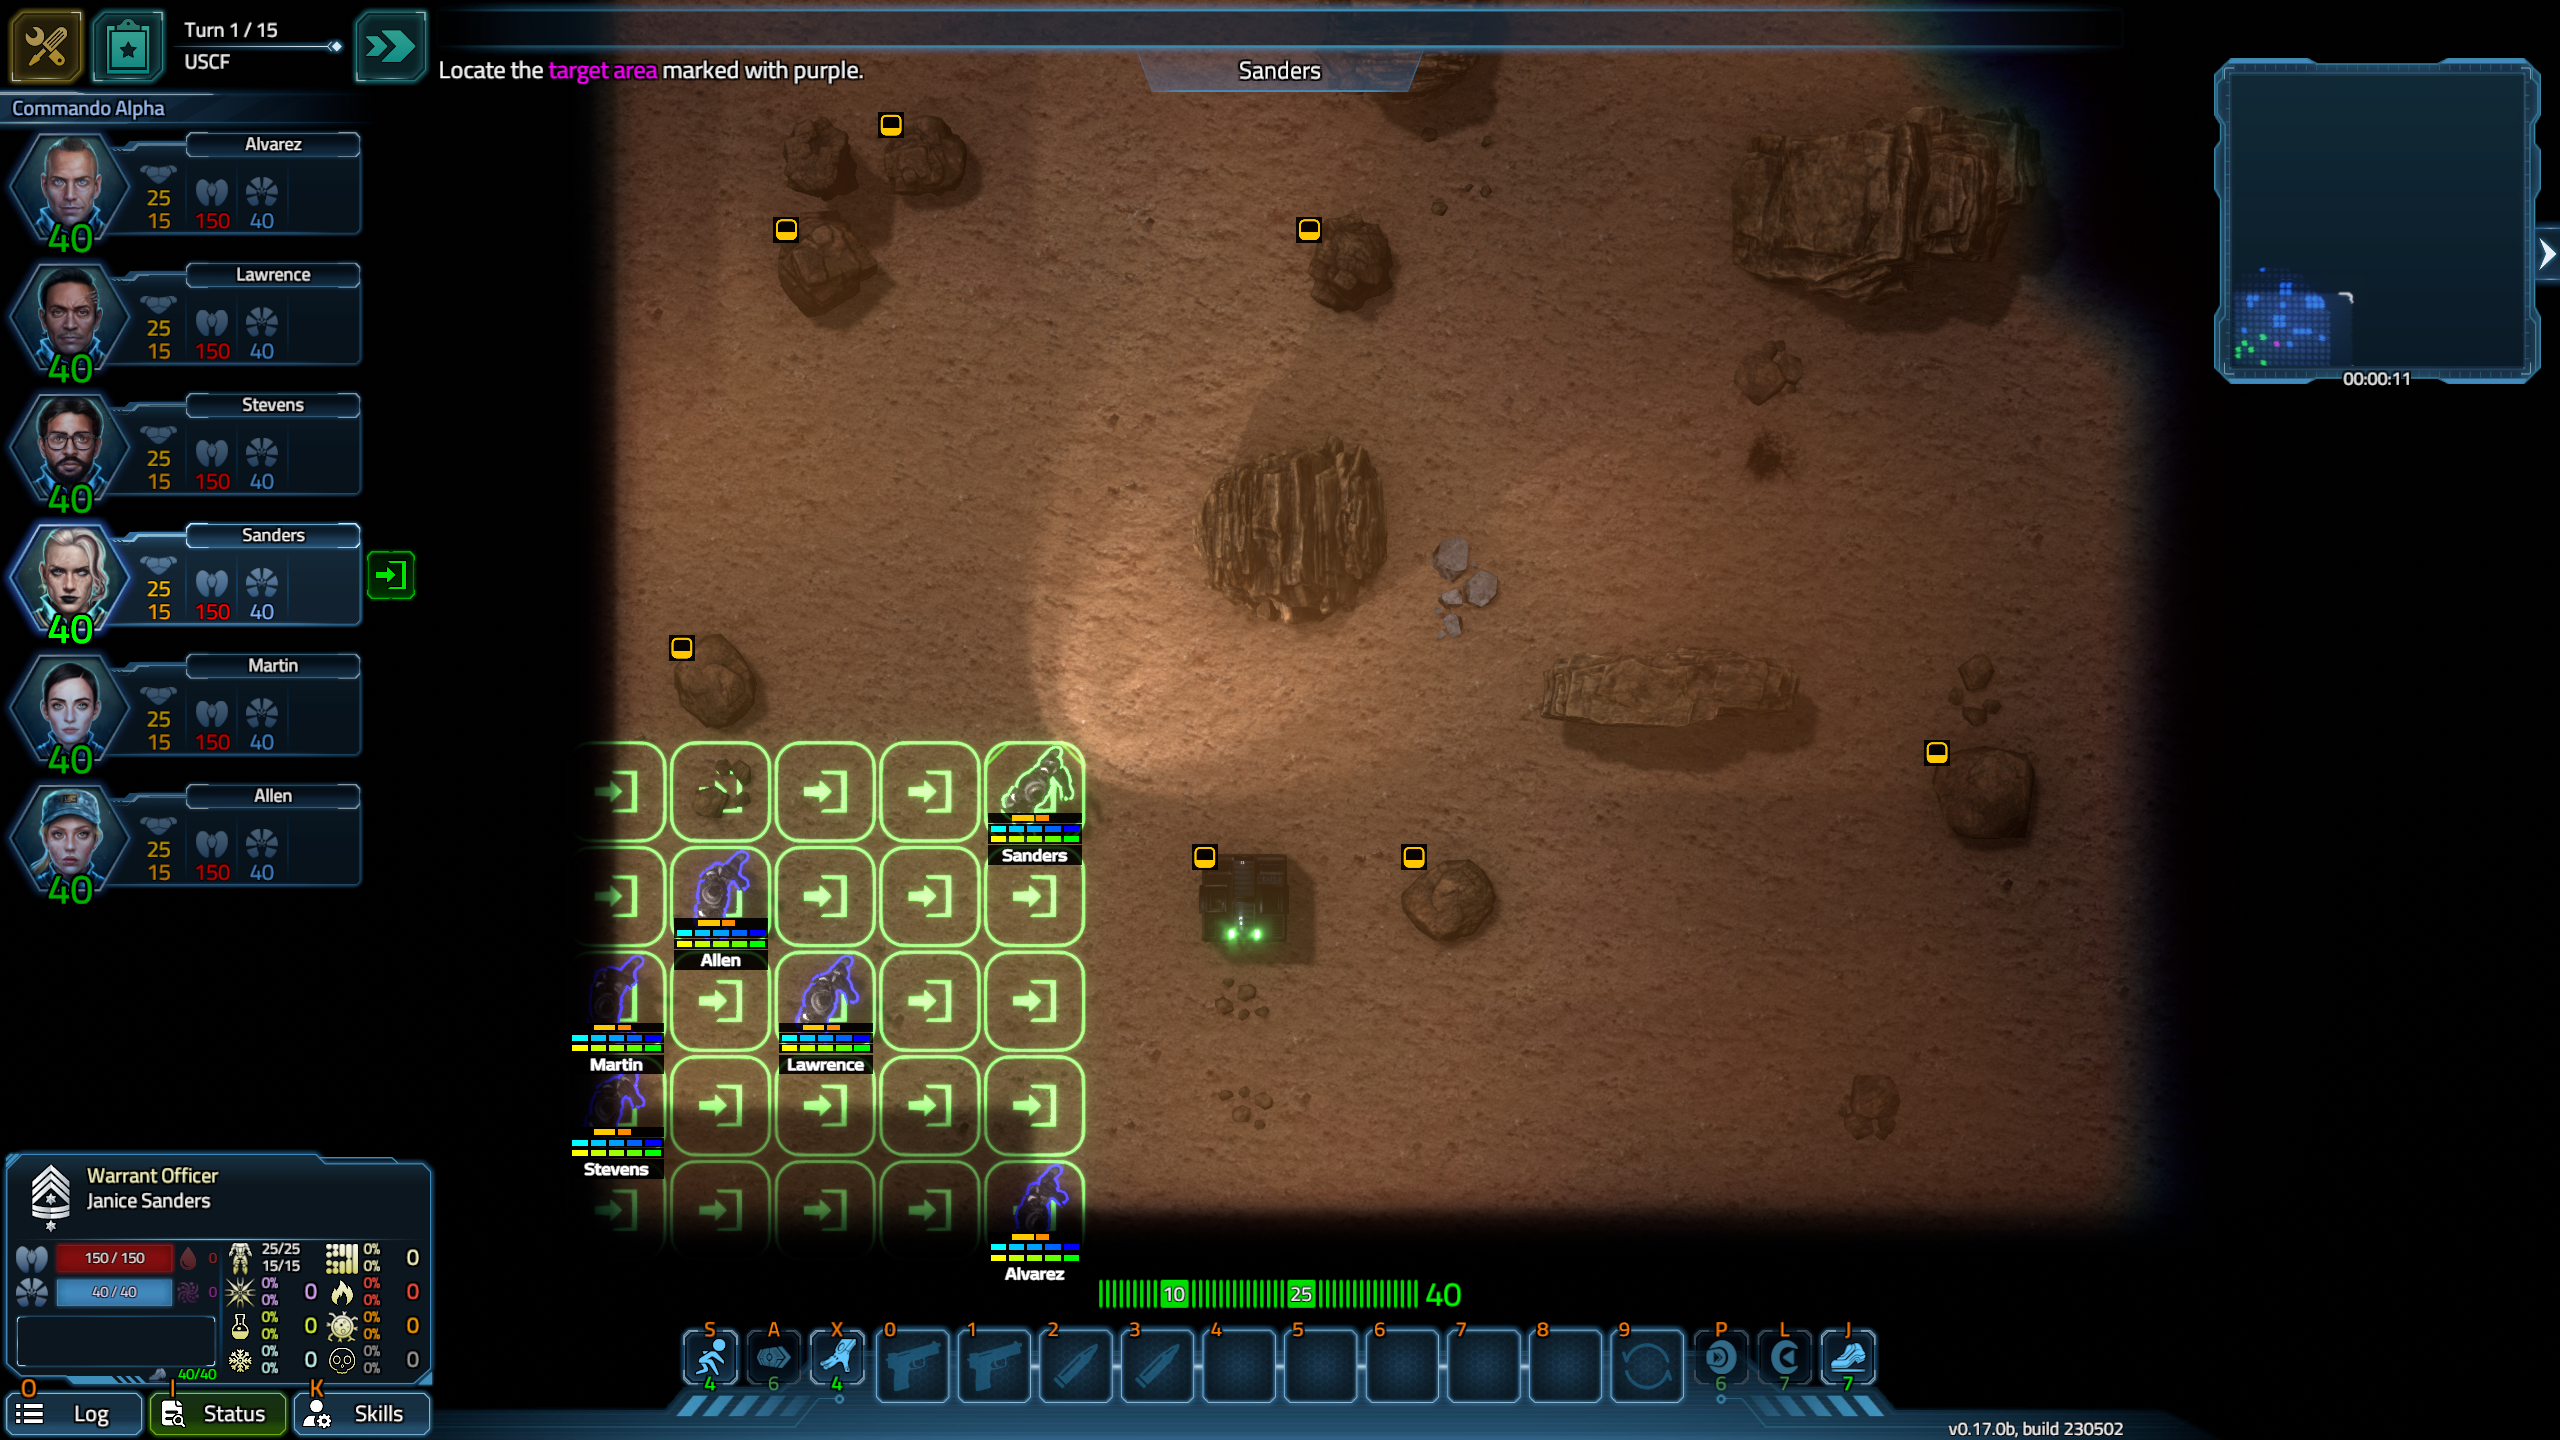
Your marines (units) are organized into Squads. A Squad may consist of 3-6 units by default. If you have more than 1 Squad in a mission, you may select any marine in any Squad while it's your turn in single-player mode. Otherwise, different players and their Squads can only act after one another. You directly control all of your units. To do so, you always have to select the unit you want to act with first.
You can do this by either:
- Left-clicking on the unit in the main view.
- Left-clicking on their unit panel in the squad view on the left.
- Pressing [F1]-[F6], respectively, based on their order in the Squad (top to bottom).
- Pressing [TAB] to select (“cycle”) the next available unit.
You can change between Squads (if you have more) by clicking on the Squad name above the unit panels on the left or by simply selecting a unit from another Squad.
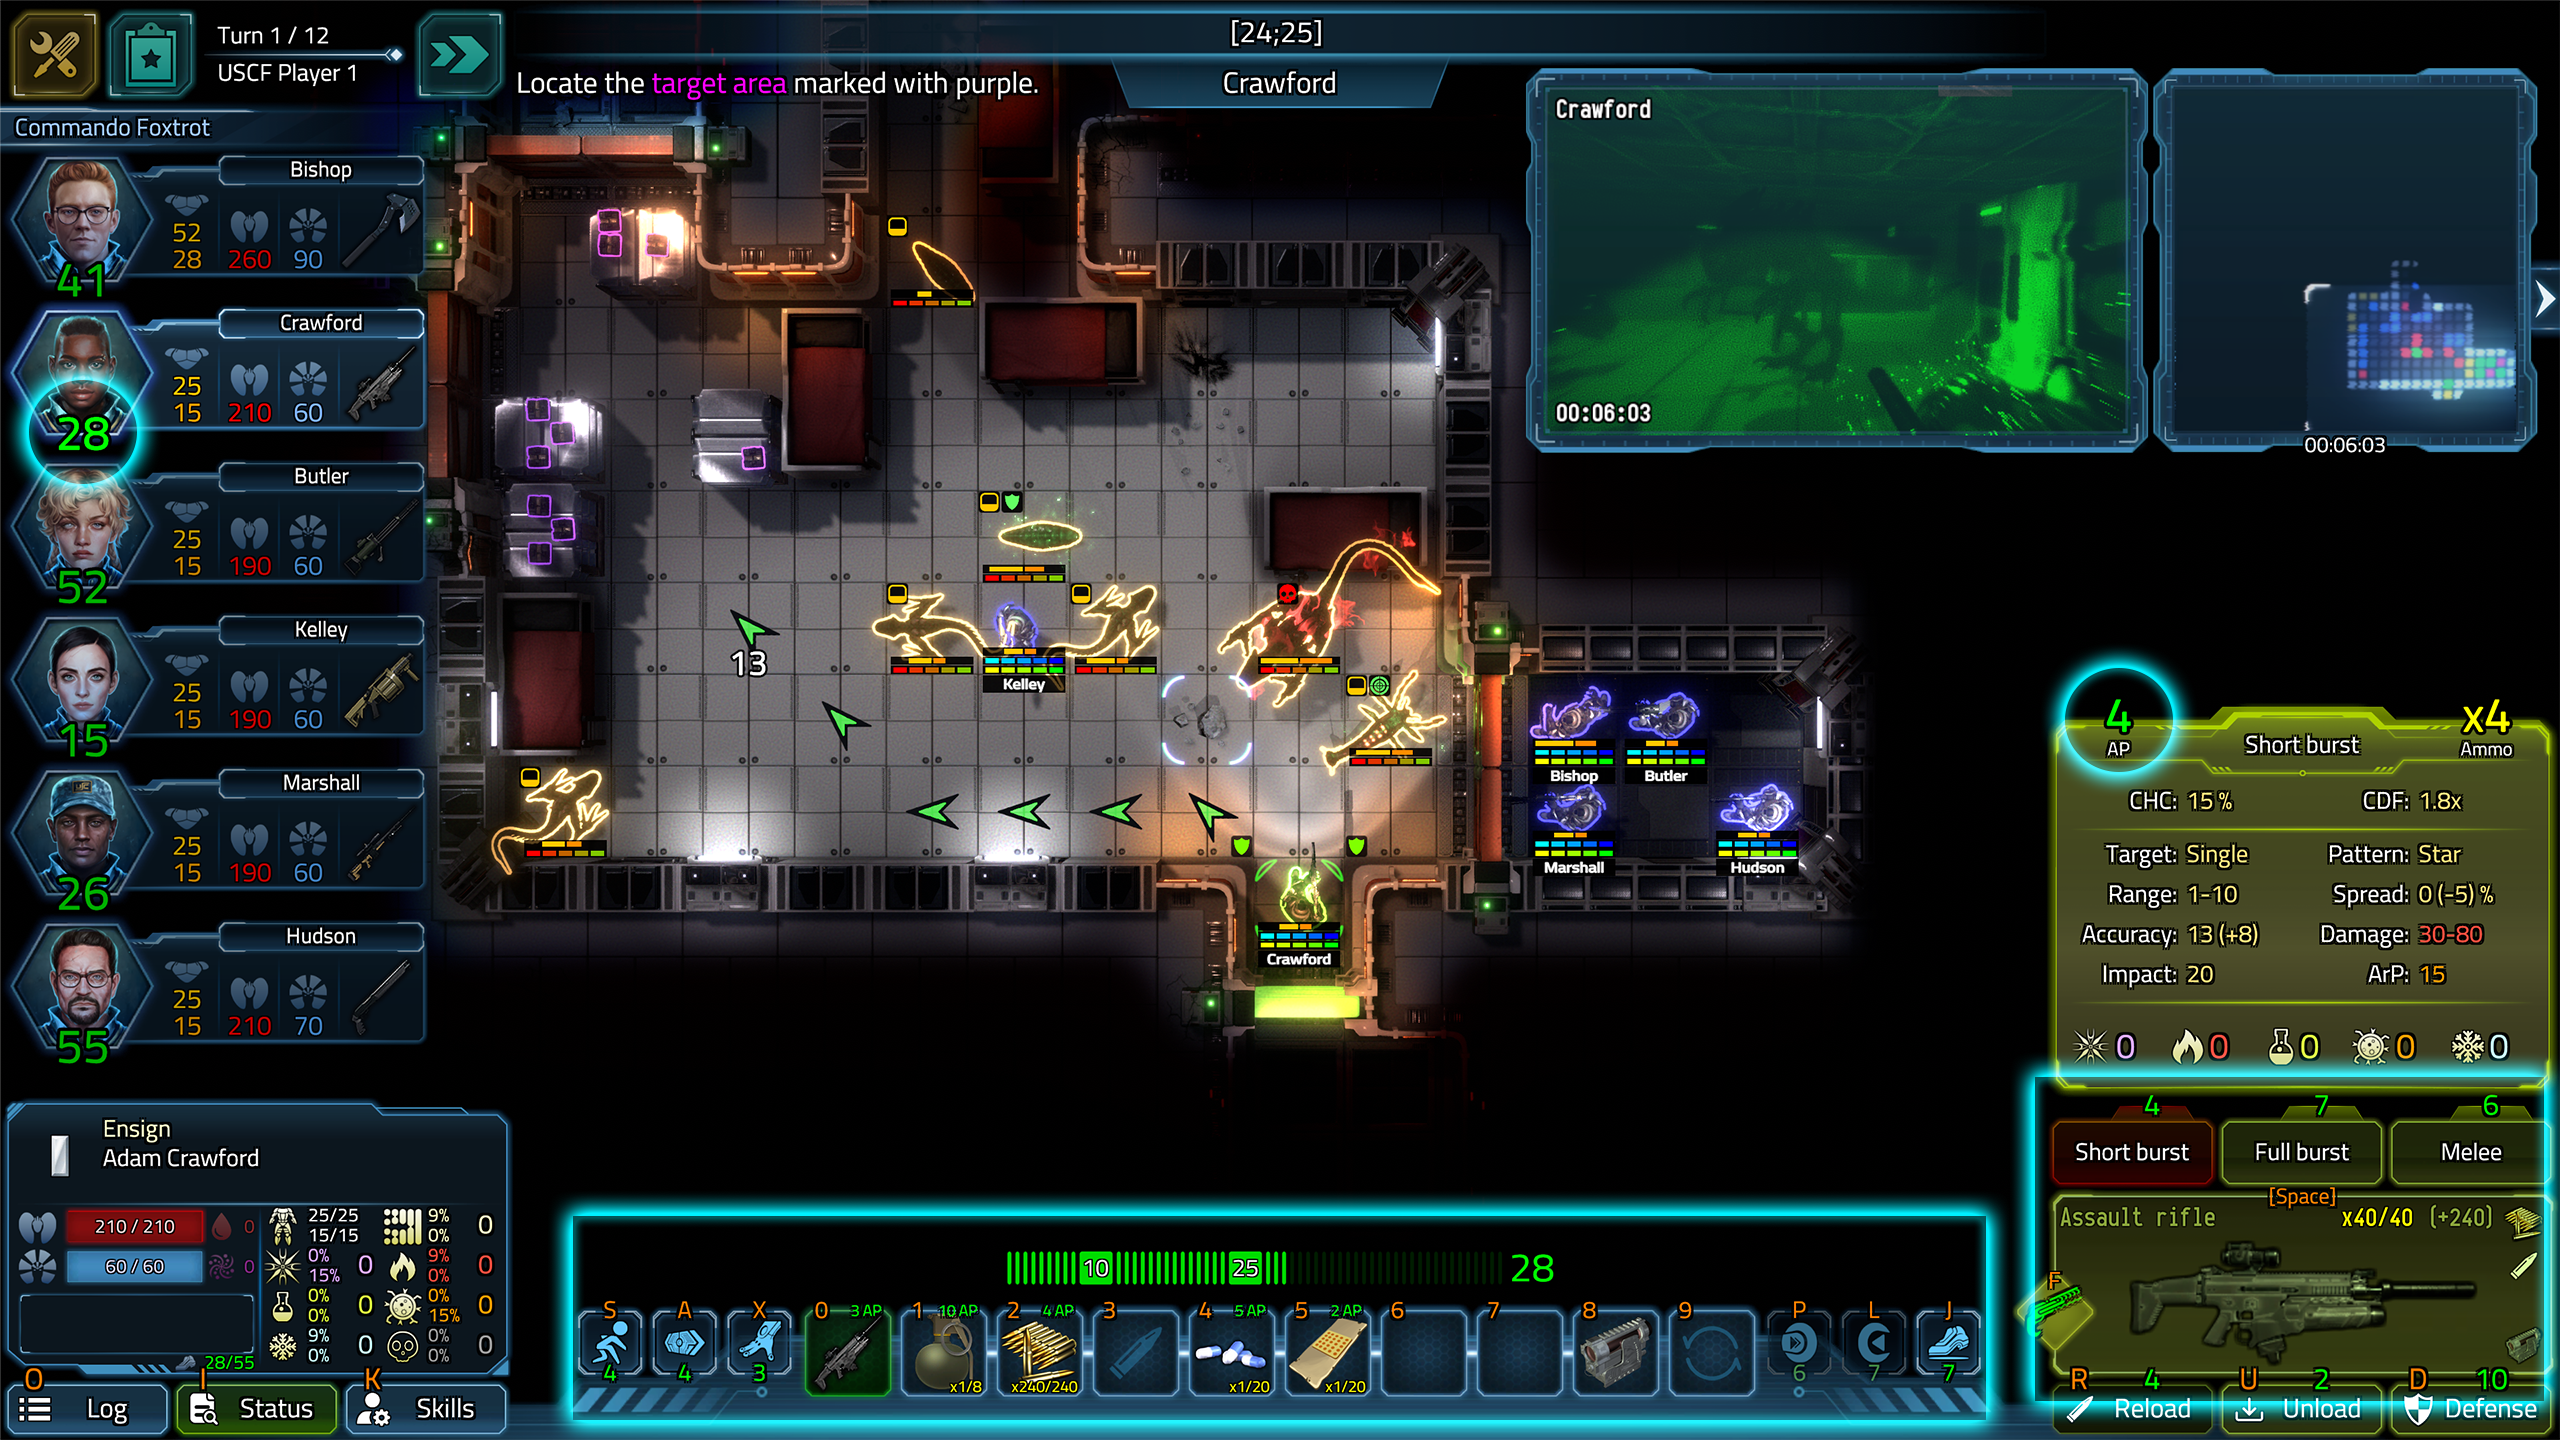
Sight and Fog of War
Fog of War means that the parts of the map you haven't explored yet are completely unknown, and not visible at all. Any enemy action in these areas won't be seen during the enemy's turn. Many missions take place in unexplored places; in some cases, though, Fog of War will not be present at all.
Once you explore a grid on the map, the Fog of War effect is permanently removed, and you'll always see structures and static objects (crates, etc.), including details when they take damage from any source. To explore a grid, you have to acquire an unobscured Line of Sight to it a single time.
Line of Sight is a different, even more important mechanic. All units can see in a 90-degree arc. When a grid is being observed by at least one friendly unit, you'll see enemies and their actions in real-time when it's their turn. When an enemy leaves the observed area, you won't see them anymore, even if Fog of War is no longer present in that area. It is very important to do exploration and perimeter checks with this is mind. Enemies can and will hide outside of the Line of Sight, and will oftentimes try to flank you.
See Turning and Line of Sight for some additional details!
Action Points
Action Points display
Numbers regarding Action Points or AP costs are shown in green on specific buttons, popup and tooltip windows.
- a unit's current available APs are shown on their unit panel, under their portrait
- they are also shown on the Action Points bar above the inventory
- action buttons and inventory item slots on the UI always show the actual AP cost of that action / item usage
- the attack mode tabs on the Combat panel also show the actual AP cost of the respective attack
- when targeting, the target tooltip will show the actual AP cost of the attack
- when interacting with items on the map, the mouseover tooltip will show the actual AP cost of the action
- item descriptions also show info about the original AP cost of an item, without modifiers
- if APs are shown in magenta, it means the unit is tranquilized or paralyzed (thus actions cost more APs than normal)
Additional rules / details
Action Points are always reset to the maximum at the start of each turn.
Exceptions:
- when a unit is knocked back, but there's not enough space behind them, they suffer a penalty to max. APs in the next turn
- severe paralysis can result in 0 APs at the start of a turn
- Bear in mind that a unit's maximum Action Points per turn is largely based on their Agility skill level. (Base: 40, +3/level) Some skills and specializations may also modify the AP cost of specific actions.
- Particular items also modify the amount of available APs per turn while they are active (e.g. different armors may reduce APs while they are being worn).
- Tranquilization / paralysis levels 1-3 increase the Action Points cost of ALL ACTIONS (including item usage and movement) by 1-3, respectively.
Moving
How to move
- left-click on a destination
- if there is a viable route, the path will appear (green, yellow, and red arrows)
- at the destination, the number will indicate the amount of APs you'll still have remaining after the movement
- if the number is negative, it means you're missing that many APs (thus you can't complete the movement in the current turn)
- a red arrow will be shown on grids you can't get to in the current turn
- left-click again on the destination to start moving
- click anywhere or press any key during movement to abort it (the unit will stop on the current grid)
Straight and diagonal movement cost different amounts of APs
Plotting and executing a movement
Additional rules / details
By default, the pathfinder will always select the shortest AND safest path.
If there's a floor hazard you don't want to avoid because it results in a longer path, you can either move grid-by-grid, or revise your settings under Settings / Gameplay / Pathfinding.
When there's a floor hazard on the path, it will be indicated by the destination AP cost being displayed in red between exclamation marks.
A path may be completely blocked by otherwise passable objects (crates you can move or destroy, locked doors you can unlock, etc.) – it is up to you to deal with these situations with your other abilities.
Remember that you can also JUMP to bypass obstacles or hazards, but the pathfinder won't take that into consideration due to different AP costs; you have to make the decision!
By default, straight movement costs 2 APs, and diagonal movement costs 3 APs.
Some objects and walls can block diagonal movement! These are generally discernable by their size, and by how they take up free space around them.
Turning & Line of Sight
How to turn
To change direction with a unit, you can either:
- right-click on the map in the desired direction
- use the numeric keys 1-9 that represent the 8 directions around key 5
Turning does NOT cost any Action Points and can be performed under all circumstances – when already in Defense mode, or being paralyzed, etc.
Additional rules / details
All units can see in a 90-degree arc, up to a range of 10. When a grid is being observed by at least one friendly unit, you'll see enemies and their actions in real-time when it's their turn. When an enemy leaves the observed area, you won't see them anymore, even if Fog of War is no longer present in that area.
All marines also have a headlight that illuminates said 90-degree arc area in its range. Especially in dark areas, increasing the light level on a grid by casting multiple headlights on it (or by other means, like flares, fire, etc.) also increases the hit chance of an attack performed against a unit there.
Some objects (big crates, machines, etc.) will block the Line of Sight (and light). Units will never block it.
Jumping
Jumping allows a unit to traverse a short distance without touching the ground, avoiding any area effect and/or half-height static obstacle. You CANNOT jump over units, not even over really small ones.
Activate jumping with the Jump button or the hotkey J (by default). (You can deactivate jumping the same way.) When jumping is activated, the grids you can actually perform a jump to will be highlighted on the map; left-click on one to perform the action.
Jumping only works in the 4 straight and 4 diagonal directions.
A secondary specialization in Agility allows a unit to traverse a longer distance (+1 grid).
The AP cost of jumping is greater than the cost of normal movement (under general conditions) – it is up to you to take this into consideration. The Pathfinder won't factor in the possibility of jumping when plotting a path – bear this in mind also!
Crouching
Your marines can crouch down. A crouching marine is considered half-height, enabling you to fire over their head.
A crouching marine also receives a slight bonus to ranged accuracy and Ranged Defense Value. Any half-height covers also count as full cover.
On the other hand, targets behind half-height covers that you would normally be able to attack may become obscured.
Movement while crouching costs +1 APs per grid.
To crouch / stand up, use the Change state button left of the inventory.
Moving Objects Pull&Push
Many objects you encounter can be moved (pulled or pushed). The list includes crates, barrels, databanks – anything that is not too big (i.e. doesn't take up more than 1 grid), and not considered fixed to its surroundings.
To push an object, you need to stand next to it and click the Push button, then left-click on the object you actually wish to push by 1 grid. (If there are more objects, you can choose which to move.) You can only push an object if nothing is blocking its movement. (Even hiding aliens may do so in some cases!) By default, pushing costs 6 APs.
Pulling works similarly, but the grid behind you must be free. By default, pulling costs 7 APs.
You CANNOT pull/push aliens, marines, or other units (like turrets).
A secondary specialization in Endurance lowers the cost of pushing and pulling by 1 AP.
Under Settings/Gameplay, you can find an option called “Legacy directional interaction mechanics.” If you enable this, you need to face the object you want to move, but you don't need to click on it on the map – just press the action button!
Environmental Hazard
Area effects
Fire: explosions and direct firearm hits on flammable materials create fire. These generally subside over the course of 2-3 turns. While burning, though, stepping into them results in a moderate fire buildup increase with the chance of being instantly set on fire.
Shadow Fire: Shadow Envoys leave behind trails of shadow energy infused fire as they move. Stepping into one of these increases shadow energy buildup that does damage at the start of the next turn and cannot be treated. Aliens stepping into shadow fire will be healed for 10 HP. The shadow fire subsides after a few turns.
The pathfinder will automatically try to avoid these hazards if possible. To override this, move grid-by-grid through the hazard, or revise your settings under Gameplay/Pathfinding.
Hazardous materials
Radioactive pool: these greenish pools of liquid, radioactive materials can be found all around places where alien activity has been observed. It is known that Wurms and Wormpigs secrete this “bile” as part of their life cycle. Stepping on one of these will confer acid and poison buildup. The pools are also flammable.
The pathfinder will also treat these objects as “to be avoided.
Neutral volatiles
Hydrazine pools / spills: these hard-to-see pools of extremely flammable hydrazine hydrate rocket fuel can be a curse or a blessing, but you must learn to keep your eyes open for them. When ignited, these pools explode in a 3×3 area, dealing high amounts of physical and fire damage. If a marine is burning, the pathfinder will treat hydrazine pools as “to be avoided.”
Hydrazine barrels: these barrels are pretty sturdy for what they are, but once severely damaged, they combust in a deadly explosion. You can “secure” them by procuring the hydrazine from them.
Generators / Reactors: when destroyed, a big and deadly explosion occurs. Gauss SNF reactors are extremely dangerous this way.
Operating Doors
Doors can have 4 states:
- open
- closed: can be opened by any unit able to operate doors
- locked: can be unlocked via hacking
- sealed (welded): can only be unsealed with a welding torch
You can close an open door by standing next to it and using the Operate door button. The doors you can operate from the position you're at will be marked, and you can left-click on one. For double-sided and double-layered doors, it's enough if one of the wings is adjacent to you. You CANNOT close a door if an object or unit is blocking one of its wings. Some small aliens (Wurms, Swarmers) are an exception to this: they are automatically crushed to death when they stand in a closing door's way.
A closed door can be opened with the Operate door button, or by clicking on the door itself while it is highlighted in green. Alternatively, you can plot a path through the door, and it will be automatically opened upon performing the movement (AP costs will still apply!)
A locked door can be either locked normally, or be hardwired. In both cases, it has a lock level between 0-5 that determines the chance of success of unlocking it, based on your Electrotechnics skill and the quality of the hacking device (if any) you use. Locked doors can't be operated without hacking. Aliens can never hack doors. Also see the "Hacking (Electrotechnics)" entry!
Doors need to be powered for their hydraulics to work. If a door loses power, it automatically unlocks AND opens!
Sealed doors can't be opened until they're unsealed. A door can be locked AND sealed at the same time; both statuses need to be removed before you can open it. To seal/unseal a door, use the welding torch item on it.
Sealed doors stay closed even without power!
Inventory & Items
Your marines have 10 inventory slots in total. Without a primary specialization in Field expertise, the first two are restricted to weapons and other ordnances, the second two to ammunition and other ordnances, and the last to consumables only.
Each slot may contain a full-sized, non-consumable item (like weapons, extra armor, tools, etc.), or a stack of ammo or consumable items. Stackable items all have a maximum stack size that depends on the type of item.
Equipping items
Units don't have dedicated “equipment slots.” Items in the inventory are all considered carried (and generally available for use). Some items do require equipping, though: weapons and wearables (extra armor, etc.) An equipped (active) item will be displayed on a green background. Equipped items can't be dropped (unequip them first). To equip or unequip an item, right-click on it, or use the slot hotkey (0-9).
Equipping or unequipping an item costs Action Points, which are displayed over the slot in green.
Using items
To use tools and consumable items, right-click on them, or use the slot hotkey (0-9).
If the item is a self-consumable, like a stimulant, it will be instantly consumed.
If the item needs a target, the viable grids will be highlighted, and you can left-click on one to proceed. To cancel the usage, right-click on the item again. The currently used item is displayed on a yellow background.
Using an item costs Action Points, which are displayed over the slot in green. For uses with a target the cost is only applied when the action actually takes place.
Organizing items
Organizing items in your inventory doesn't cost any Action Points, but activating/equipping/using an item usually does.
Moving items:
- left-click on an item to select it, then
- left-click on a suitable slot to move it to. This can be either:
- an empty slot with no restrictions, or with appropriate restrictions
- a stack of items of the exact same type (merge stacks)
Swapping items:
- left-click on an item to select it, then
- left-click on a slot with another, different item or stack; if both slots have no or appropriate restrictions, the two items or stacks will be swapped
Splitting and merging a stack of ammo
Splitting stacks:
- left-click on an item stack to select it, then
- right-click on an empty slot or on a non-full stack of compatible items to split off 1 piece
- you can hold SHIFT for batch splitting (amount depends on item)
- when done, either deselect the original stack (left-click), or left-click on the last stack you split it into
Merging stacks:
- like moving, but the target slot needs to be a non-full stack of the exact same item type
On dropping, passing, and picking up items, see the next Encyclopedia entry!
Items: Pick up, drop, pass
Picking up items
- use the Toggle item pickup button (default hotkey: X) to mark all adjacent grids with items; these can be items on the ground, or items in an accessible item container (shelves, open crates, etc.)
- left-click on a marked grid to display the item pickup bar above the inventory; this does NOT cost APs
- left-click on an item on the pickup bar to actually pick up the item (if possible)
- picking up an item costs 4 APs by default
- even if your inventory is full, you can pick up items that can be automatically merged with an existing stack
Dropping items
- select an unequipped item (left-click on it)
- grids you can drop it to will be automatically marked; left-click on one to drop the item
- default AP cost is 3
- a grid can only contain a maximum of 8 items/stacks
- even if the target grid is full, you can drop items that can be automatically merged with an existing stack
Passing items
- select an unequipped item (left-click on it)
- adjacent units you can pass the item to will be marked; left-click on one to drop the item
- default AP cost is 5
- you can't pass an item if the target unit doesn't have a suitable inventory slot
- even if the target's inventory is full, you can pass items that can be automatically merged with an existing stack
- you CANNOT throw an item (throwing a grenade is technically considered item usage)
Items: Weapons & Ammo
Looting a weapon from a crate, then equipping and loading it from inventory
Weapons
Weapons are full-sized (i.e. not stackable) items that need to be equipped (“taken in hand”) before use. When a weapon is equipped, the combat panel is visible in the bottom right corner, and you can access combat-related actions.
A unit may have two or more weapons in their inventory, but only one can be equipped at a time. Switching between them can be done by simply equipping a new weapon–this will have a combined AP cost of the respective unequip and equip actions. A weapon doesn't need to be kept in a weapon slot, but it's recommended, as you'll probably need the non-restricted slots for other items.
Most weapons use ammunition and have a specific caliber (or more generally, ammo type) ammo capacity. When a weapon is loaded, the ammo in it is actually inside the weapon, so if you pass that weapon to someone else, they can use it.
Weapons must be unloaded AND unequipped before you can sell them in the Squad Assembly screen.
Shields are also considered weapons, thus you can keep them in a weapon slot, and they also need to be equipped for their effects to apply.
Ammunition
Ammunition (ammo) are stackable items, varying in maximum stack size. By using (right-click) a stack of ammo, you can specifically load that kind of ammo in the currently equipped weapon (if compatible). For example, by using the HCB Acid Charge ammo item, you can automatically swap out the HCB Mark II ammo in your Bulleteer. Swapping ammo like this costs both the unload and reload APs of the weapon–but this extra cost is factored into the AP number displayed over the ammo's item slot.
When unloading a weapon (including ammo swapping), the unloaded ammo will be automatically merged into the first compatible stack of ammo, or if there's none, it will appear as a new stack. If, for any reason, it doesn't fit into the inventory, the excess stack will be dropped to the ground.
Hand grenades, mines, and deployable ordnances (turrets) are all considered both weapons and ammo, thus you can keep them in any of the combat-related restricted slots.
Hacking (Electrotechnics)
A skilled marine manually hacks (unlocks) a door, then seals a service tunnel
During missions, you will encounter different electronic systems that need to be hacked to be operated.
Some of the most important ones are:
- doors (either initially locked, or you want to lock them)
- door consoles (they lock/unlock connected hardwired doors)
- generators / reactors (you can turn them on/off)
- code fragment databanks (access them to loot code fragments)
All of these have a lock level between 0-5. The chance of success for a hacking action depends on your Electrotechnics skill (and any bonus from the hacking equipment used) compared to this level. For lower level systems, no skill is required if the unit has a good enough tool. Secondary specialization in Electrotechnics will allow a unit to hack some systems without a tool, while a primary will allow them to bypass hardwiring without accessing the respective control console.
To hack a system without a tool, you need to stand next to it, and click on the object when it is highlighted in green.
To use a hacking tool, you just have to use the item in your inventory, then select a target. Better hacking tools can even be used remotely.
There are also some objects that require no hacking per se, but having points in Electrotechnics will greatly reduce the AP cost of operating them. Such objects are:
- mainframe databanks (primary objective for specific missions)
- generic databanks (access them to loot datapads)
- service tunnel hatches (access them to seal them, preventing alien reinforcements)
- valves
Interactive Objects
Many of the objects you find on a map can be interacted with in some form or other. Generic interactions do not require any skills or tools (though, for example, some proficiency in Field expertise or Electrotechnics can reduce interaction AP cost), and objects you can interact with will be automatically highlighted in green if you have the APs for the interaction. Then you can left-click on the object to perform said interaction.
Some of the generic interactive objects are:
- closed/locked doors: open/unlock manually (if possible)
- closed item crate: open lid to see inside (becomes a container)
- service tunnel hatches: close & seal hatch (no more alien reinforcements from it)
- generic and mainframe databanks: loot datapad/datadisk
- hydrazine barrels: procure hydrazine (barrel is no longer volatile)
Some objects require hacking to be interacted with – see the Hacking (Electrotechnics) entry.
Many objects can be moved – see the Moving objects entry.
Many objects are half-height, which means you can see, fire, and jump above them.
Objects and structures also provide cover from a given direction, which reduces an attacker's chance to hit you.
Almost all of the objects and structures you encounter are destructible, and many are flammable. On the other hand, you can also repair objects and walls/doors with a field repair kit.
→ Next: Combat mechanics