Combat Mechanics
Table of Contents
The Combat Panel
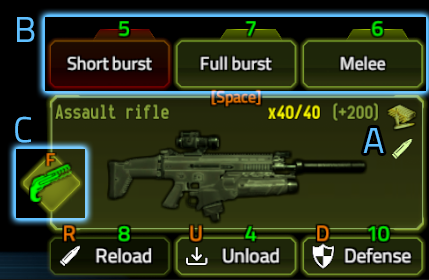
Whenever a selected unit has a weapon equipped, the combat panel is visible in the bottom right corner of the screen. This is where you can control all your weapon-related actions.
A: the middle, big panel with the weapon's image, name, and ammo information also serves as the aim toggle (or ready/holster weapon) button (hotkey: SPACE). Use it to enter targeting mode in order to attack, or holster your weapon manually.
Ammo information not only shows how much ammunition is currently loaded in the weapon (e.g. 40/40), but tells you how much of the exact same ammo is available from your inventory (e.g. +200). Subtypes of the same caliber (e.g..223) aren't taken into consideration.
On the right, you can also see an icon of the loaded ammo, and an icon related to its primary type, such as armor piercing, incendiary, acidic, etc.
B: Above the aim toggle button are the three attack mode selector buttons. These are used to switch between the different attack capabilities of the weapon (see the Attack modes entry.) The green numbers, as always, indicate the Action Points cost of using (not just selecting) an attack mode.
Disabling FF lock to fire at a neutral object
C: The Friendly Fire Lock button is used to toggle the possibility of aiming at neutral (empty ground, walls, objects) and friendly targets. When the button is green, friendly fire attacks are DISABLED. When it's red, they are ENABLED.
Note: Having FF lock enabled (safe) doesn't mean you can't do friendly fire damage accidentally; it means, however, that your units won't attack even during Defense mode if that attack would primarily affect any friendlies.
The buttons in the bottom are for unloading, reloading your weapon, and initiating / canceling Defense mode. The concepts of these actions are covered in other Encyclopedia entries.
Attack Modes
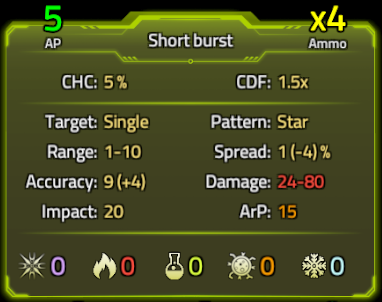
General / ranged attack mode panel
There are a lot of properties that make up an attack mode. Very often a weapon's different attack modes are quite different, and are better suited for a specific situation.
Ranged weapons all have 2 ranged attack modes and a generic, fallback melee mode that is not really suitable for efficient melee combat, but can help in Melee Defense if there's no other option.
Properties from left to right, top to bottom:
- AP: Action Points cost. The number always shows the actual value with modifiers, not the weapon's default.
- Ammo: The amount of ammunition consumed by a single attack. Has to be fully available to be able to use the attack mode.
- CHC: Critical hit chance. Critical hits are guaranteed hits irrespective of accuracy that also do extra damage.
- CDF: Critical damage factor. This is the damage multiplier applied to critical hits. Note that the Armor of the target is first subtracted from the base damage, thus critical hits against heavily armored targets may be less effective!
- Target: Target area of the attack. Single is a single unit, 3×3 and 5×5 are areas of the respective sizes, etc.
- Pattern: The targeting pattern of the attack that determines what you can aim at from your current position. Can be Star, Sweep, Free, Arc, Passthrough, or something special. See the respective Encyclopedia entries!
- Range: Interval of the minimum and maximum (effective) range. An attack can't be made at closer than the minimum or further than the maximum range.
- Spread: The degradation rate of accuracy per grid, starting from the minimum range + 1 and up.
- Accuracy: Greatly determines the chance to hit targets that are further away, in darkness, and/or behind cover.
- Damage: Interval of physical damage done by a successful attack.
- Impact: Impact force of the attack that determines the chance of knocking a target back, or shattering a frozen unit.
- ArP: Armor Penetration determines how much of the target's Armor value is ignored (bypassed) by the attack.
- Special damages: The five icons and numbers represent the maximum Tranquilizing, Fire, Acid, Poison, and Cryo damage done by the attack.
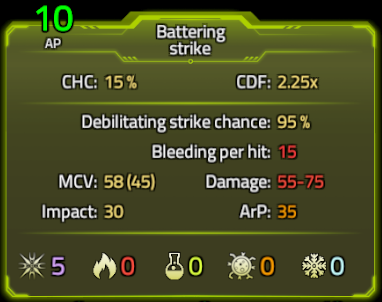
Melee attack modes
Melee attacks have a few different properties. These are:
- Debilitating strike chance: Any successful hit has this much chance (flat) to apply debilitation to an enemy, which is a non-stackable, permanent effect that reduces the damage done by that unit.
- Bleeding per hit: Any successful hit will apply this much extra bleeding, irrespective of damage done.
- MCV: The Melee Combat Value determines your chance to hit with melee attacks. MCV is greatly dependent on your Melee combat skill. The first number is the actual value, the second one in parentheses is the weapon's base attack value. A value of 50-60 is considered good enough against the most dangerous enemies.
Most melee attacks don't cost ammo, but some might (see the Stun baton for example.)
Attacking
Selecting different attack modes while aiming, then attacking an enemy
To attack, you first have to have toggle aiming on (ready your weapon). This is done by clicking the big weapon button on the combat panel, or by pressing SPACE.
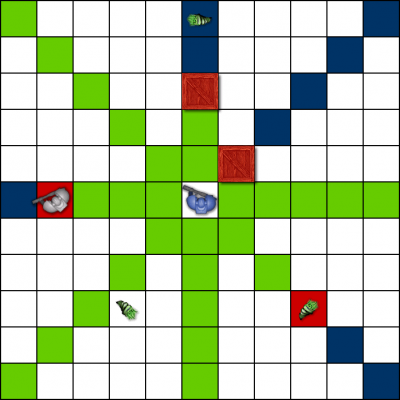
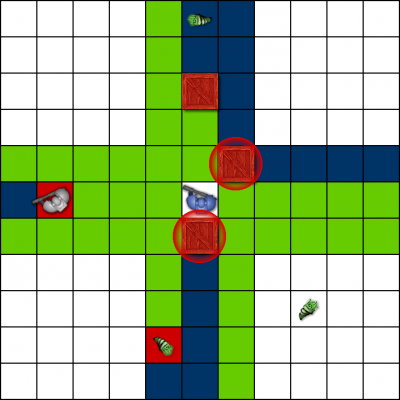
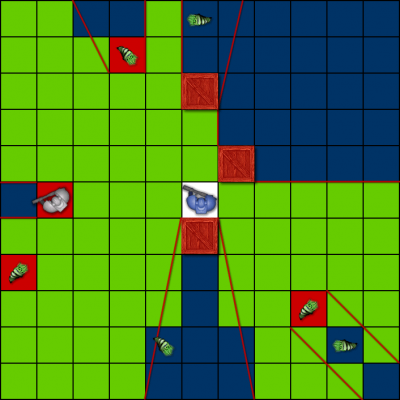
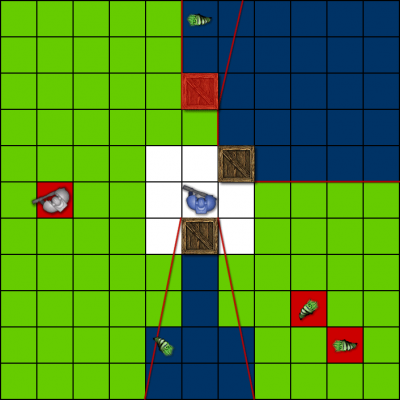
Depending on what attack pattern the currently selected attack mode has, some grids will become marked with different overlay colors.
- Faint orange grids are part of the attack pattern, but there's nothing to target there.
- Yellow grids have a neutral or friendly target that is not attackable while Friendly Fire lock is on.
- Red grids are attackable (it's either a hostile target, or FF lock is off).
To perform an attack, left-click on a grid marked in red. While the mouse is over that grid, the attack popup window will be visible. It will tell you your actual chance to hit, and provide info about the target's status.
You can move while the targeting is on.
You can holster your weapon by clicking the big weapon button again.
You can more read about Attack patterns in the next Encyclopedia entries. In general, bear in mind that different obstacles can block the Line of Fire. It seems evident for walls, but, for example, a small (half-height) target may take full cover behind even a small (half-height) object, etc.
Although the Wurm is small, it can be attacked while a marine is “leaning over” the small barrel
Attack Patterns: Star & Sweep
Attack Patterns: Free, Arc & Specials
Defense Mode
Defense Mode puts all current Action Points into reserve and provides Ranged Overwatch OR extra Melee Defense Value (based on the current weapon/attack mode).
It can be freely cancelled, earning you back all APs in reserve.
Defense Mode has a default AP requirement of 10 and a Morale requirement of 20!
In Ranged Overwatch the unit will automatically fire on targets entering its overwatch area while they have enough reserve APs and ammo. The range (area) of this overwatch can be adjusted. Under bad visibility conditions and against some “cloaked” enemies, firing is not guaranteed.
Melee Defense Mode gives you extra Defense Value and Reserve AP % physical damage reduction against melee attacks until the next turn. This bonus is not cancelled or diminished even if Morale falls below 10 or the unit is knocked back, etc. 20+ reserve APs are recommended against tougher enemies.
→ Next: Squad
← Previous: Basics
