
Defend the Base!
Table of Contents
Introduction
Welcome to the "Defend the Base!" game mode!
Defend the Base! (DTB) is a complex game mode that combines the core, tactical gameplay elements of USC:CF with a new strategic management layer. It is advisable to play other game modes (Operations, Single Missions) first to gain a firm grasp on the tactical mechanics because it's only going to get more complicated!
All tools and functions in DTB are well documented through tooltips, but we highly recommend reading at least the first few introductive Encyclopedia entries to get you situated!
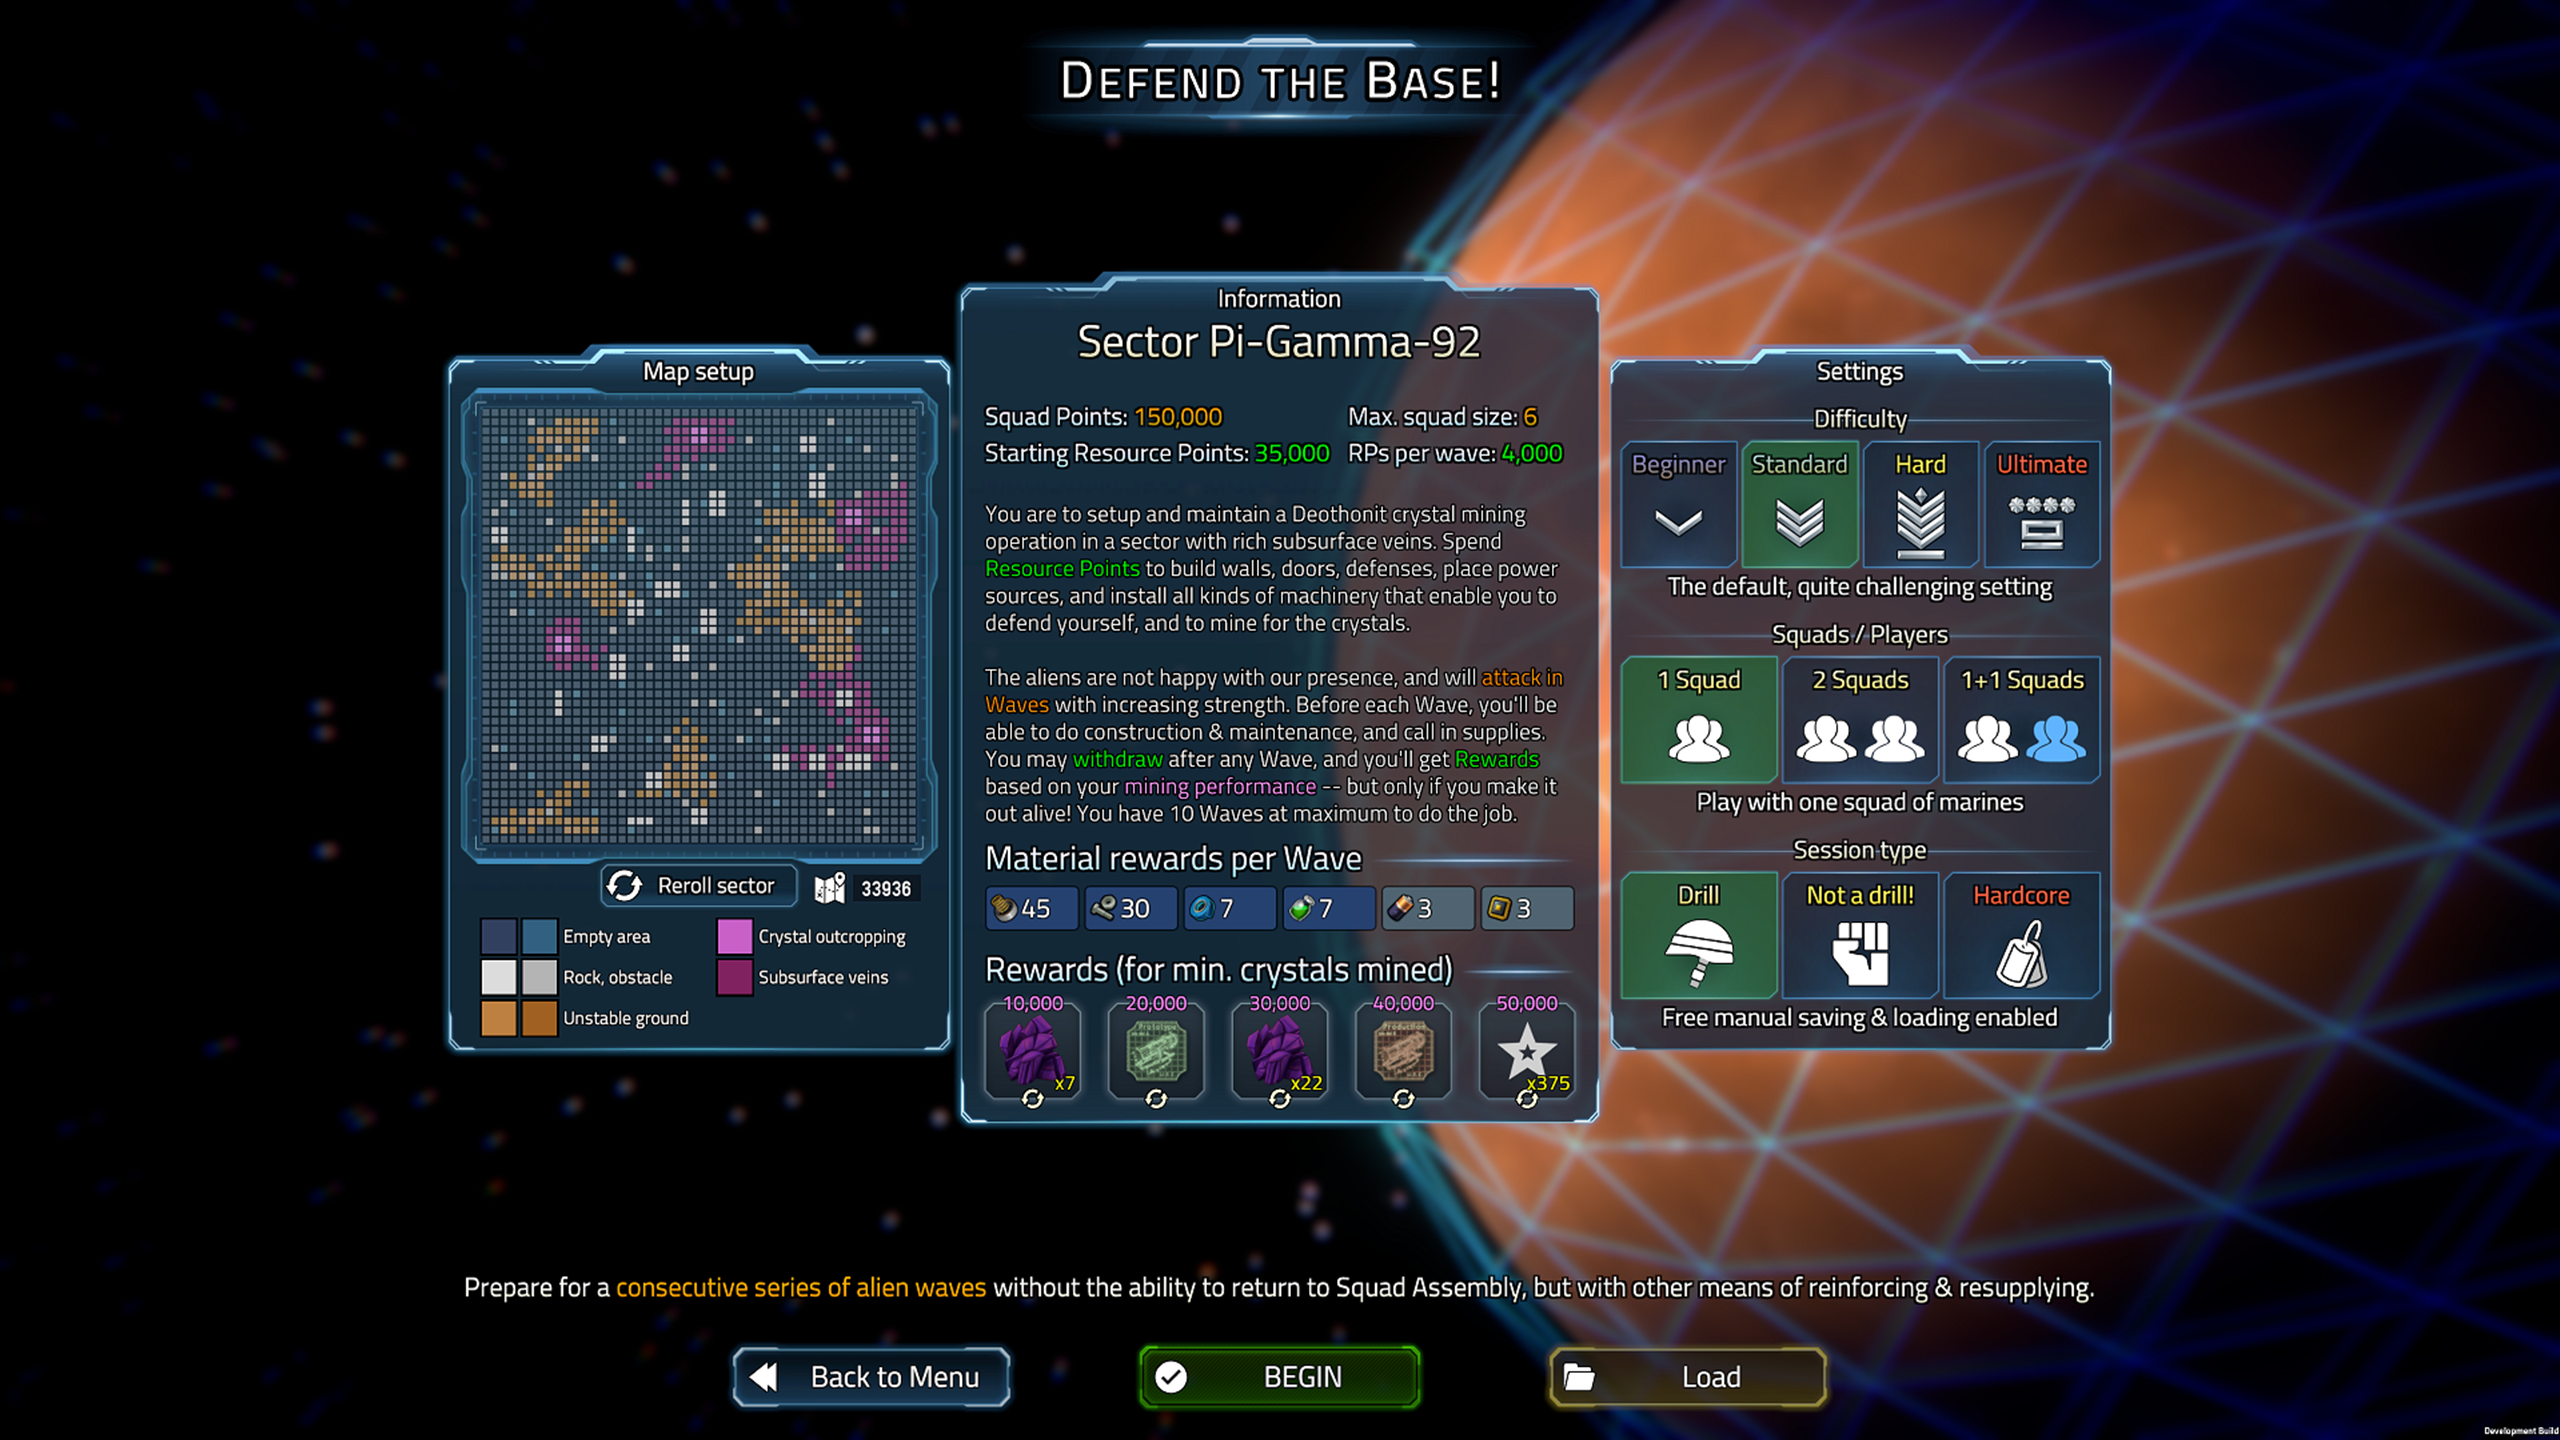
Your objective is to establish, maintain, and defend a mining operation on the surface of the planet through multiple Waves, working toward the goal of producing at least 10,000 minerals by installing and protecting mining and refining machinery. You cannot go back to Squad Assembly during the mission, but you'll be able to purchase all kinds of supply crates.
Each Wave consists of a Construction and a Defense Phase. In the Construction Phase, you can spend Resource Points (RPs) to build walls, rooms, place various machines, buy supplies, repair damage, and so on. When you're ready, the Defense Phase begins, where the alien Horde commences an attack on you. If you can survive the onslaught for a specified number of turns, the Horde will retreat, and a new Construction Phase begins.
After hitting the goal of 10,000 minerals mined, you'll have the option in any Construction Phase to scuttle and abandon the base, winning the game. You'll gain rewards based on your performance, i.e. the amount of minerals you produced. There's a new tier of rewards for every 10,000 units, up to 50,000, which is the true goal of a USCF Commander. You have a maximum of 10 Waves — two days — to achieve this. You also gain crafting materials after each Wave you survived. There is one very important rule, though: you must survive! Either fight through Wave 10 or abandon the base before. If your forces are wiped out, you gain none of the rewards!
Introduction - Brief strategic plan
1. Find a good surface position for your first drilling site: optimally, it should be a deothonit outcropping surrounded by rich subsurface veins (use the raw materials overlay [default hotkey: C] to visualize these), surrounded by rocks, and far from unstable ground, to help your defense.
2. Construct a Harvester on the outcropping.
3. Construct a room and place a generator (a Gauss SNF reactor is recommended) for adequate power supply near the Harvester. You can use the power overlay [default hotkey: P] to visualize the range of your power supply.
4. You can construct additional rooms for refineries and/or optimizers to increase your material yield. You can also place bunk beds for better recuperation between Waves.
5. Construct a few subsurface drills in the vicinity. You don't need too many; spread them out on the veins so each can mine optimally through multiple Waves.
6. Set your squad deployment area(s) near the site, and construct some floors around it for supply crates, and for covering unstable ground (if any) to prevent enemies from burrowing.
7. In the first Wave, you probably don't need any additional supplies. You can install a few turrets, mines, and hydrazine barrels instead to help your defense.
8. Proceed to the Defense Phase (press BEGIN).
9. Defend yourself and your machines during the attack. After 10-20 turns (based on Wave, respectively), the aliens will retreat. Kill as many as you can to prevent more reinforcements in the next Wave.
10. While in combat, prioritize your own safety. If the aliens attack a machine, it's important that you protect it; if they attack walls, that might not be a priority.
11. In the next Construction Phase, repair damage to your machines, and most importantly, fix rooms that might have been reduced in their functionality, preventing the machines in them from operating.
12. Check the status of your mining equipment. Eventually, you'll have to relocate your operations, as materials will run out from an area. You can sell everything you don't need, for a reduced price (this helps you get funds for building new things, but it's not mining income, so it won't count into your mission progress).
13. Make sure to buy supplies (ammo, medical items) and reinforce defenses.
14. Repeat 8-14 until you hit your target (10,000 minerals mined minimum, 50,000 optimally).
15. Scuttle and abandon the base as soon as you're satisfied. No heroics!
Introduction - The Construction Phase
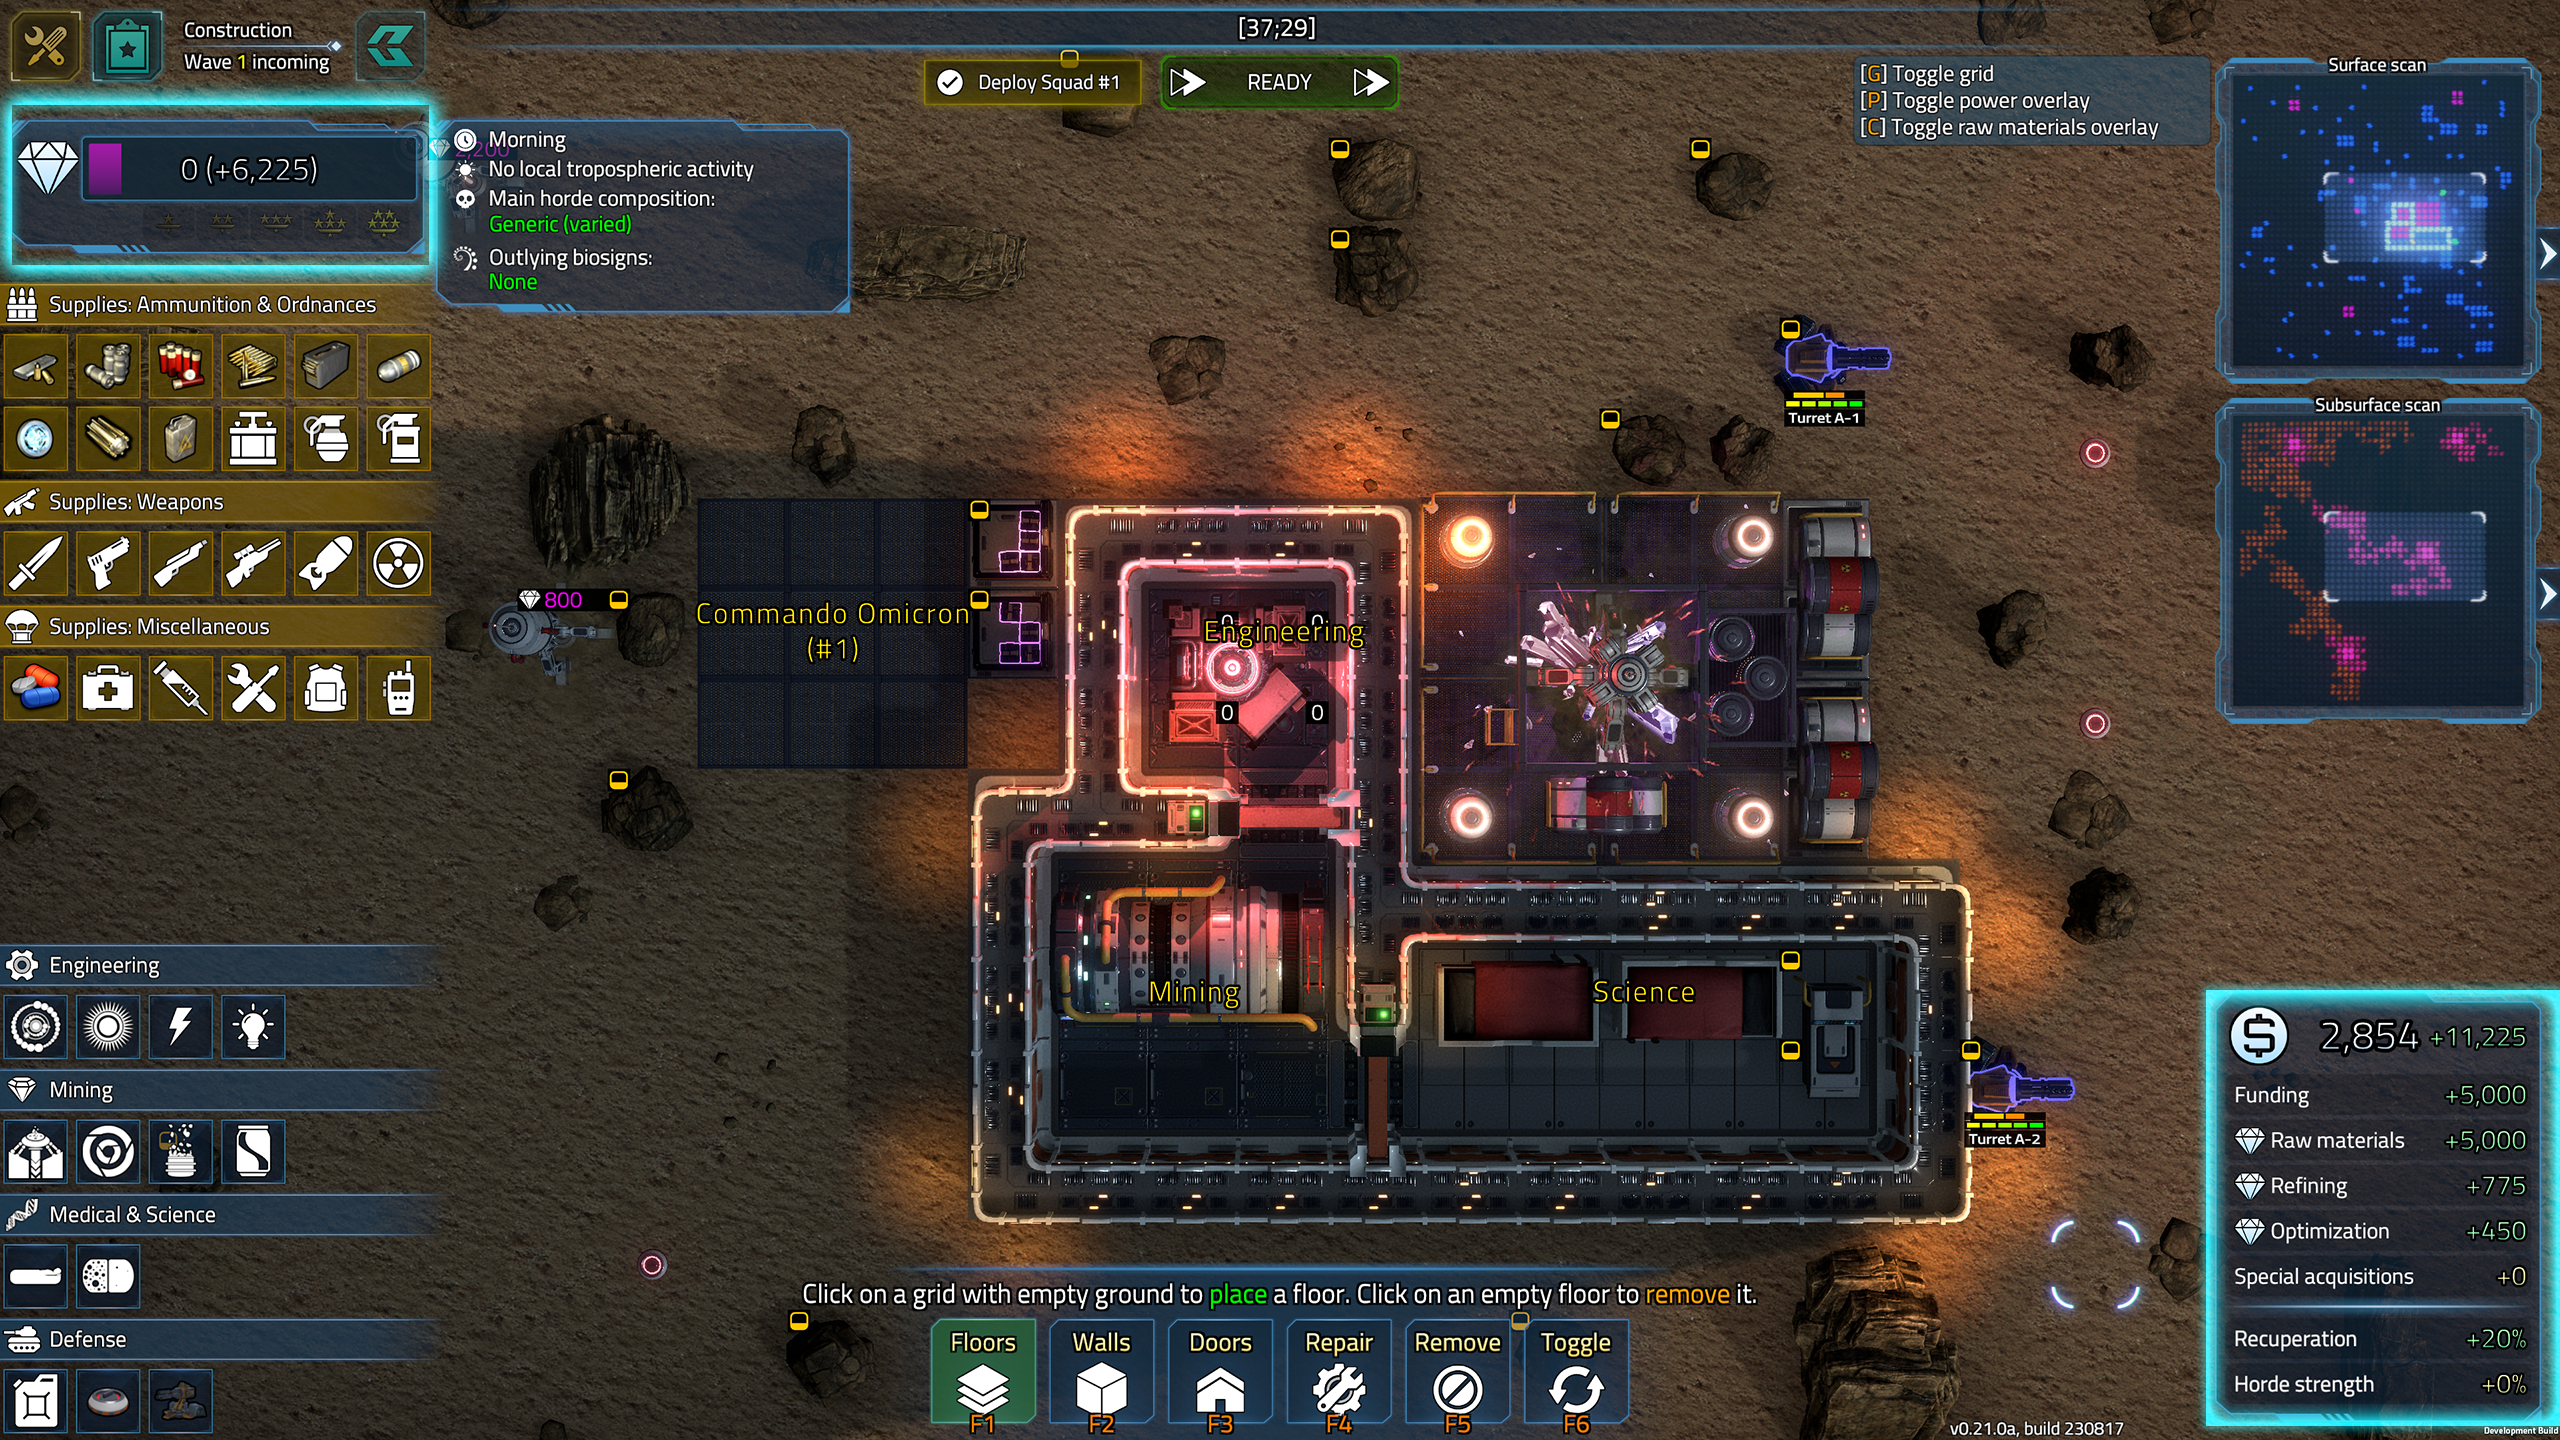
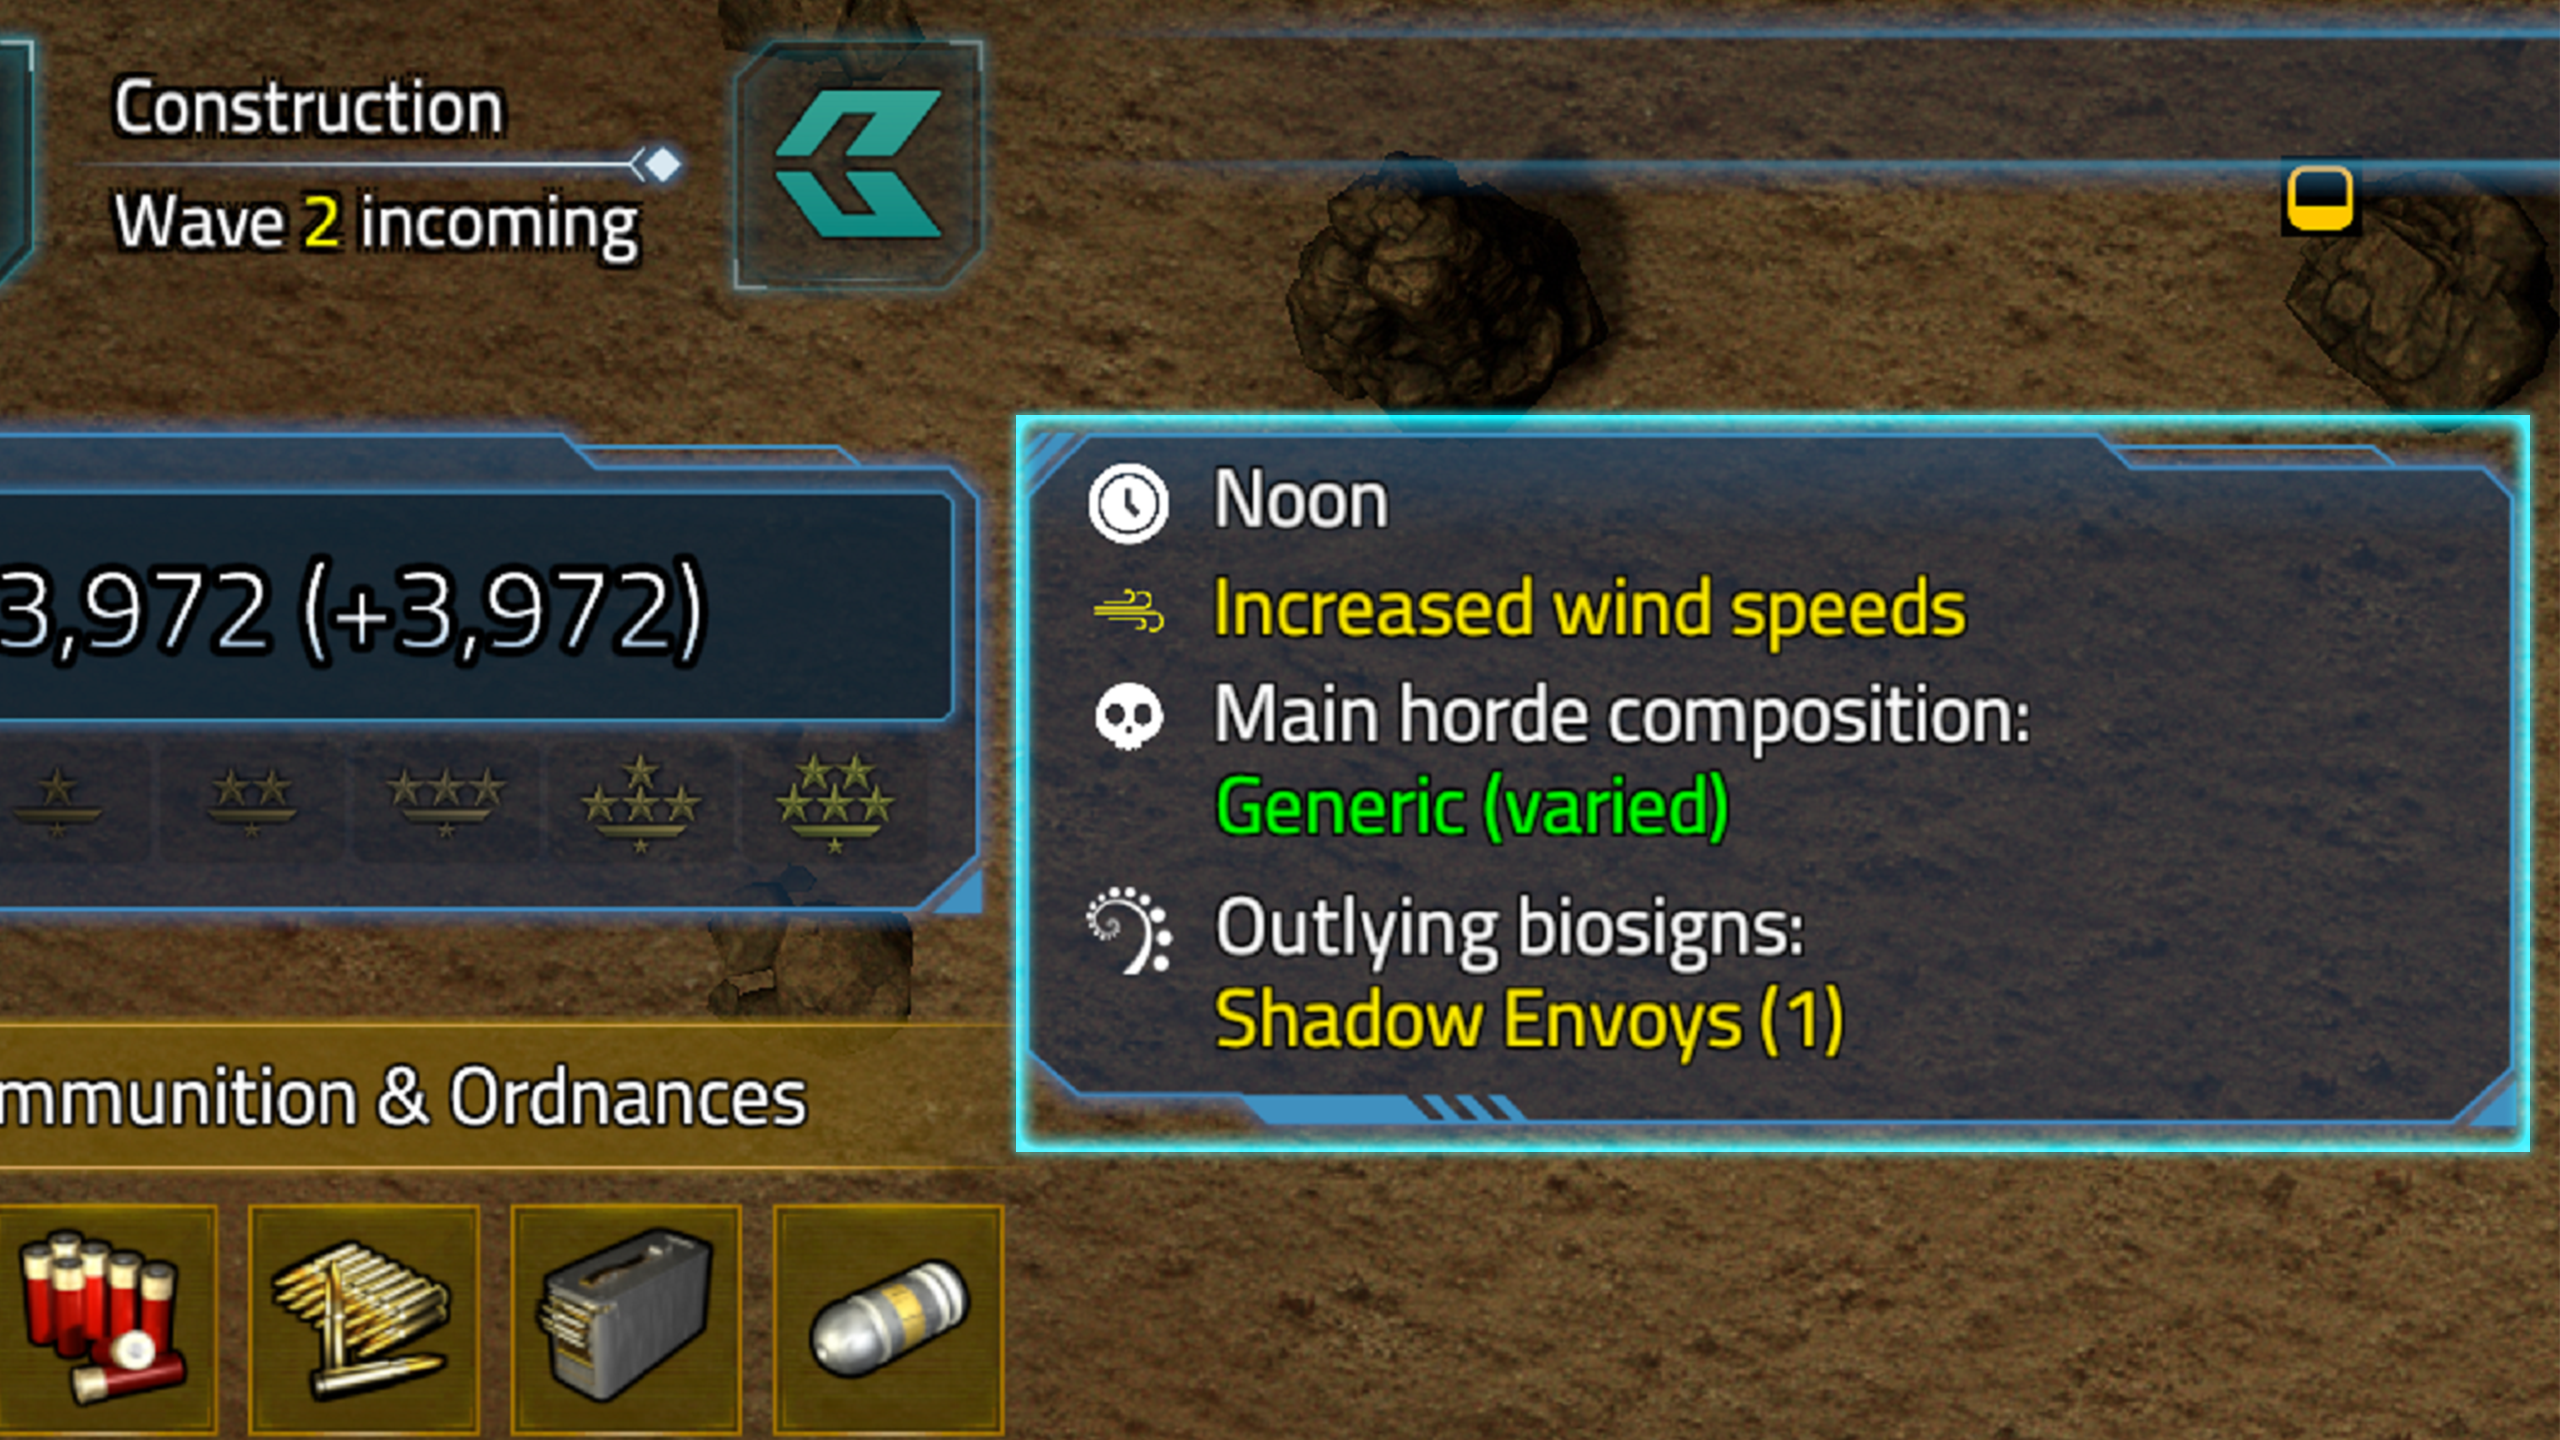
You can spend Resource Points (RPs) to perform construction, maintenance, and resupply actions. You'll start the game with a considerable amount (depending on game difficulty), as you need to set up the mining site from scratch. In the bottom right corner of the screen, you can find your current RPs, your total income, and the different avenues of your income (Funding, Raw materials, Refining, Optimization, Special acquisitions). Spend your RPs wisely — you'll always have some income to resupply and repair, but true success requires a large enough, productive operation that is somehow still defendable.
In the top left corner, you can see your mission progress. This is the amount of minerals you successfully mined and refined. The three components of your income marked by the diamond icon — Raw materials, Refining, and Optimization — make up your mission progress per Wave. This means that minerals you mine and refine can be spent in the next Wave, but they also count toward your mission progress.
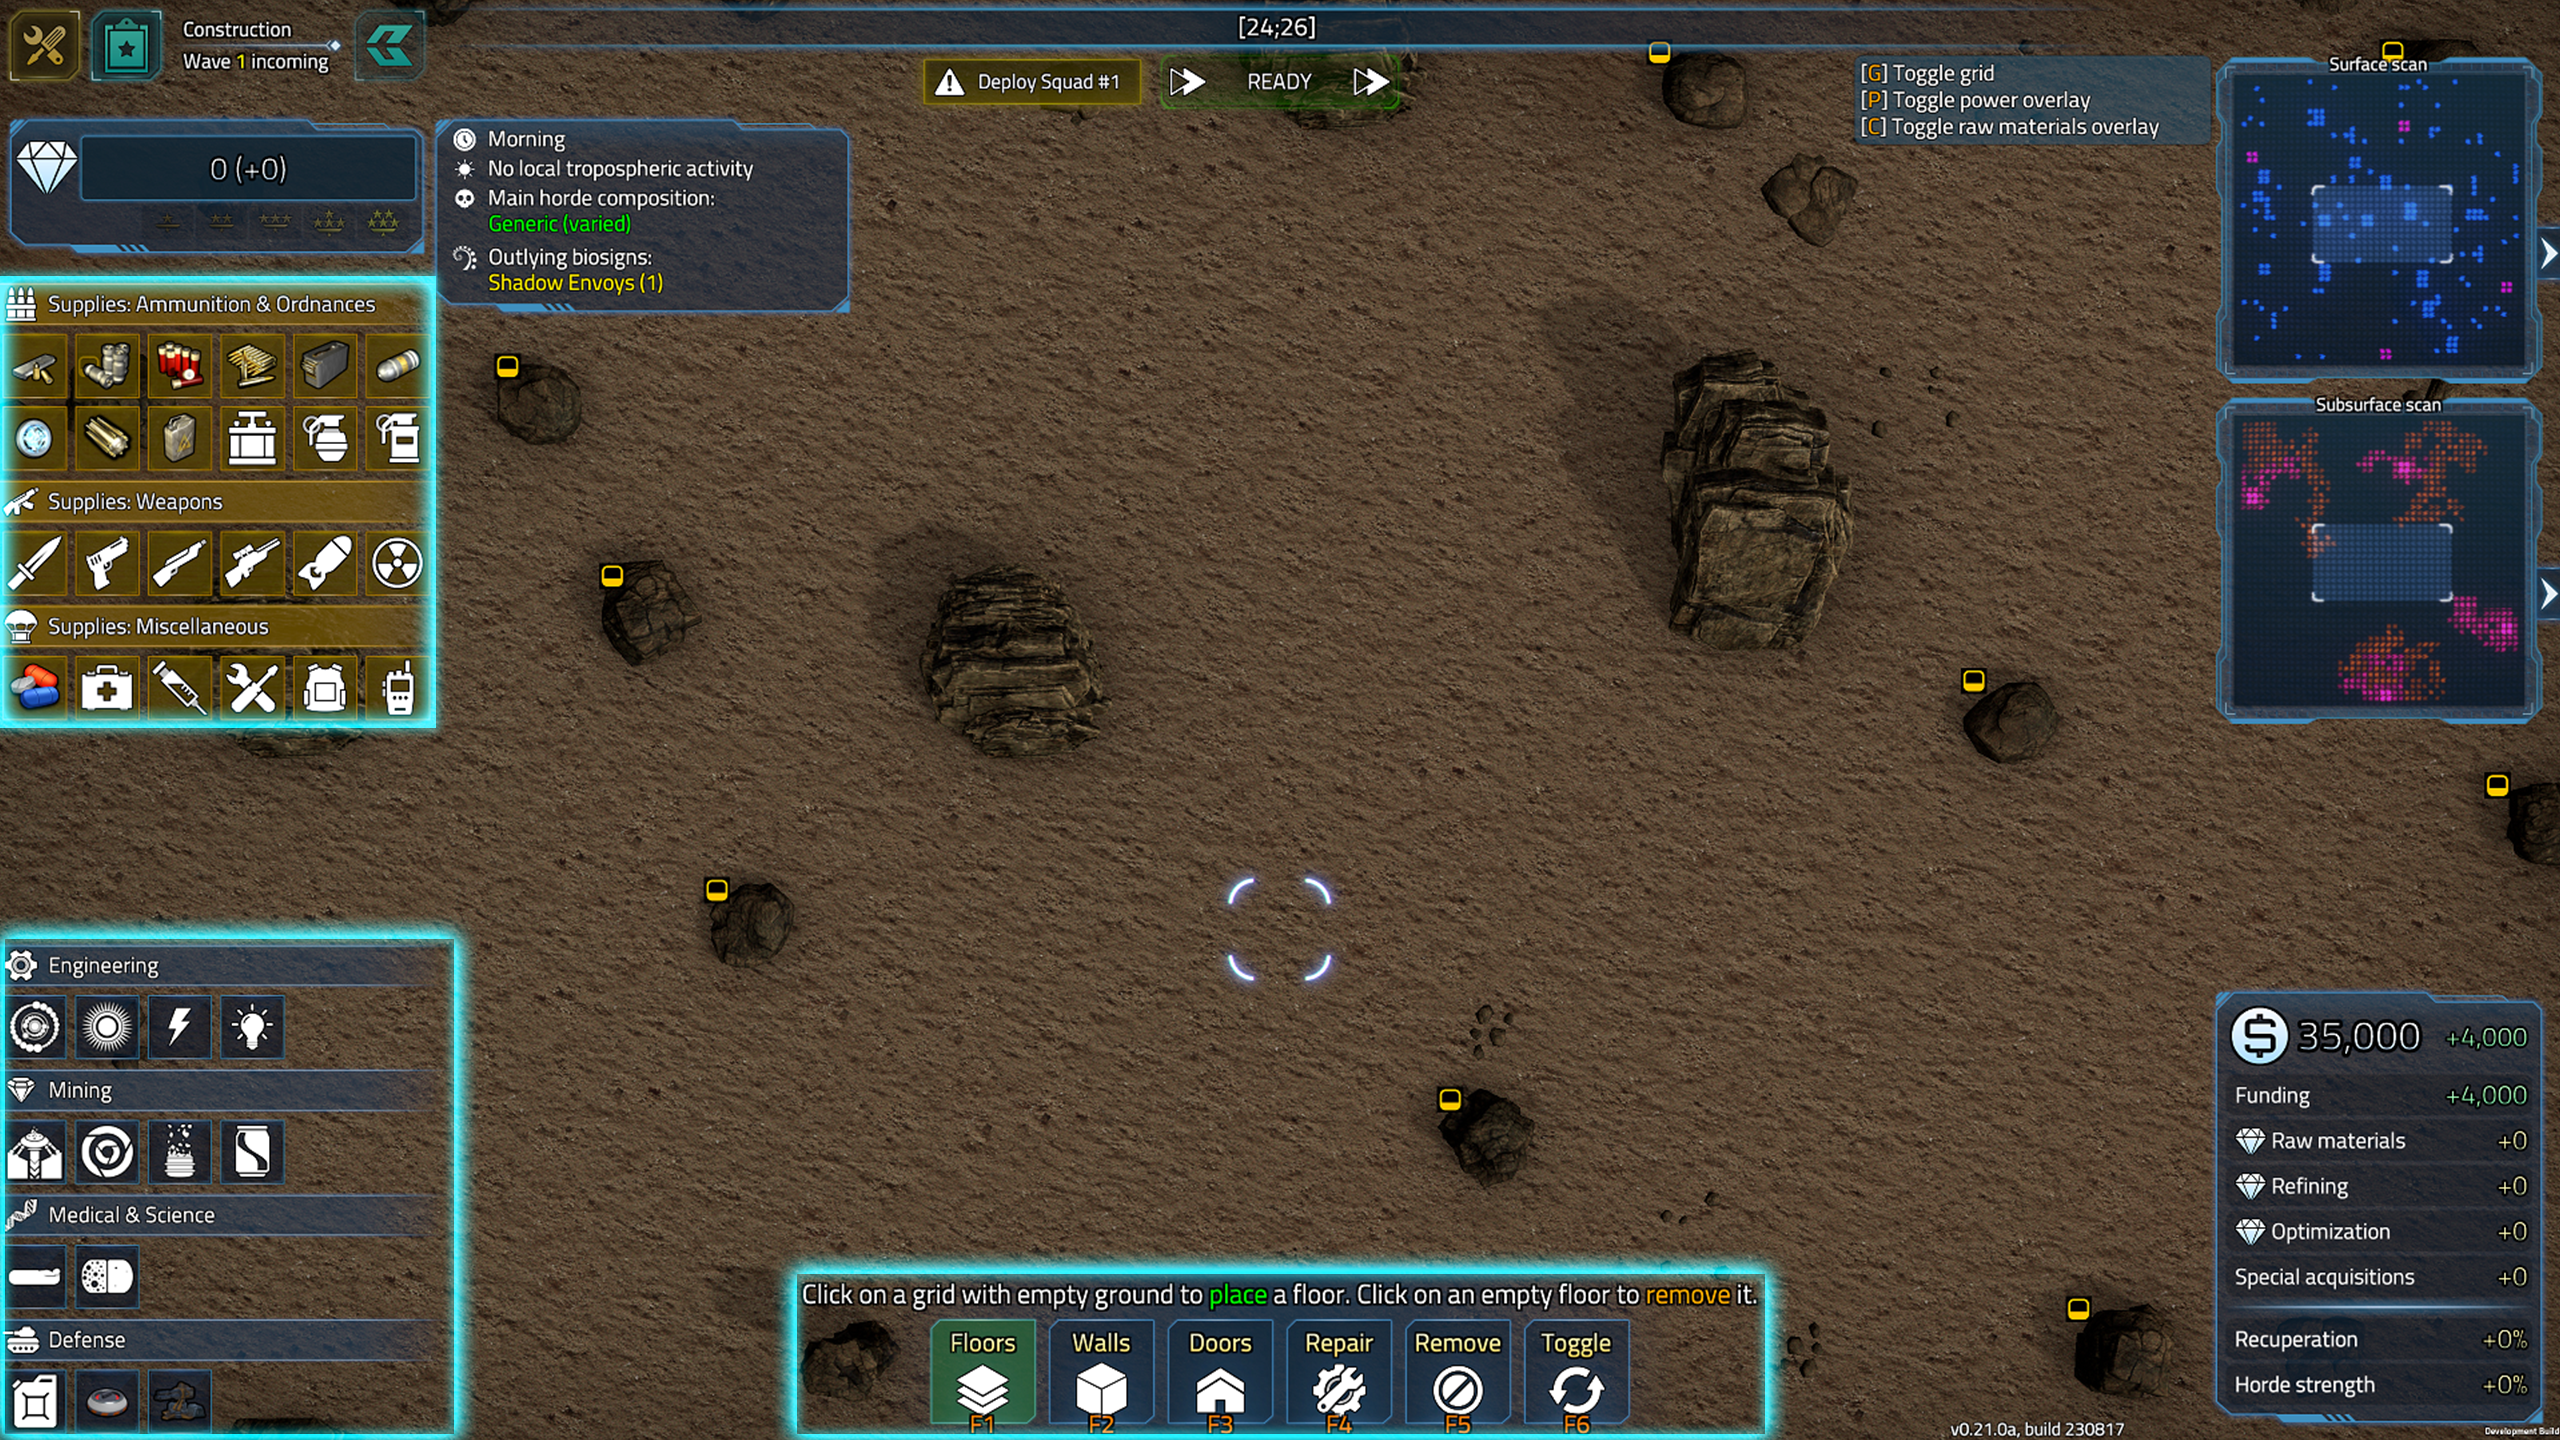
In the bottom center, you have the main toolbar. The tools here are used to build, alter, repair, and remove structures — walls, floors, and doors. Building and maintaining functional rooms is a very important task, as many machines you need or ought to have can only be placed in such a room (see later).
Below the mission progress bar on the left, you can find your resupply options. All supplies come in crates that you need to place on floors (either in a room or out on a platform). You can review their price and content, and plan accordingly. There are a lot of tools at your disposal if you have the Resource Points to buy them!
In the bottom left corner are the different machines and other equipment you can install. They come in four categories: Engineering (power sources & related), Mining (different drills & related), Medical & Science, and Defense. Different machines have different requirements — the most important being their power requirement (if any), and room requirement (if any).
In the top center you find buttons to place your squad(s)'s deployment areas, and to end the Construction Phase (“READY”). You must have the deployment areas set for all squads before you can continue to the Defense Phase.
Next to the mission progress bar, there's also an information panel about the upcoming weather, with some insight into the composition of the approaching Horde.
Introduction - The Defense Phase
In the very first turn of the Defense Phase, movement and inventory actions don't cost any Action Points, which enables you to access the supply crates, distribute their contents, and put your marines into their desired initial positions. When you end the turn, the alien attack will commence.
In each Defense Phase, you only need to survive a set amount of turns — 10 in the first, and this increases with each Wave. After that, the Horde will start to retreat: aliens will rally to the edges of the map, and leave. Each alien that successfully retreats will increase the strength of the alien Horde in the next Wave, so if you still have the fight in you, you should kill as many as possible. When all aliens are dead or have left, the next Construction Phase starts.
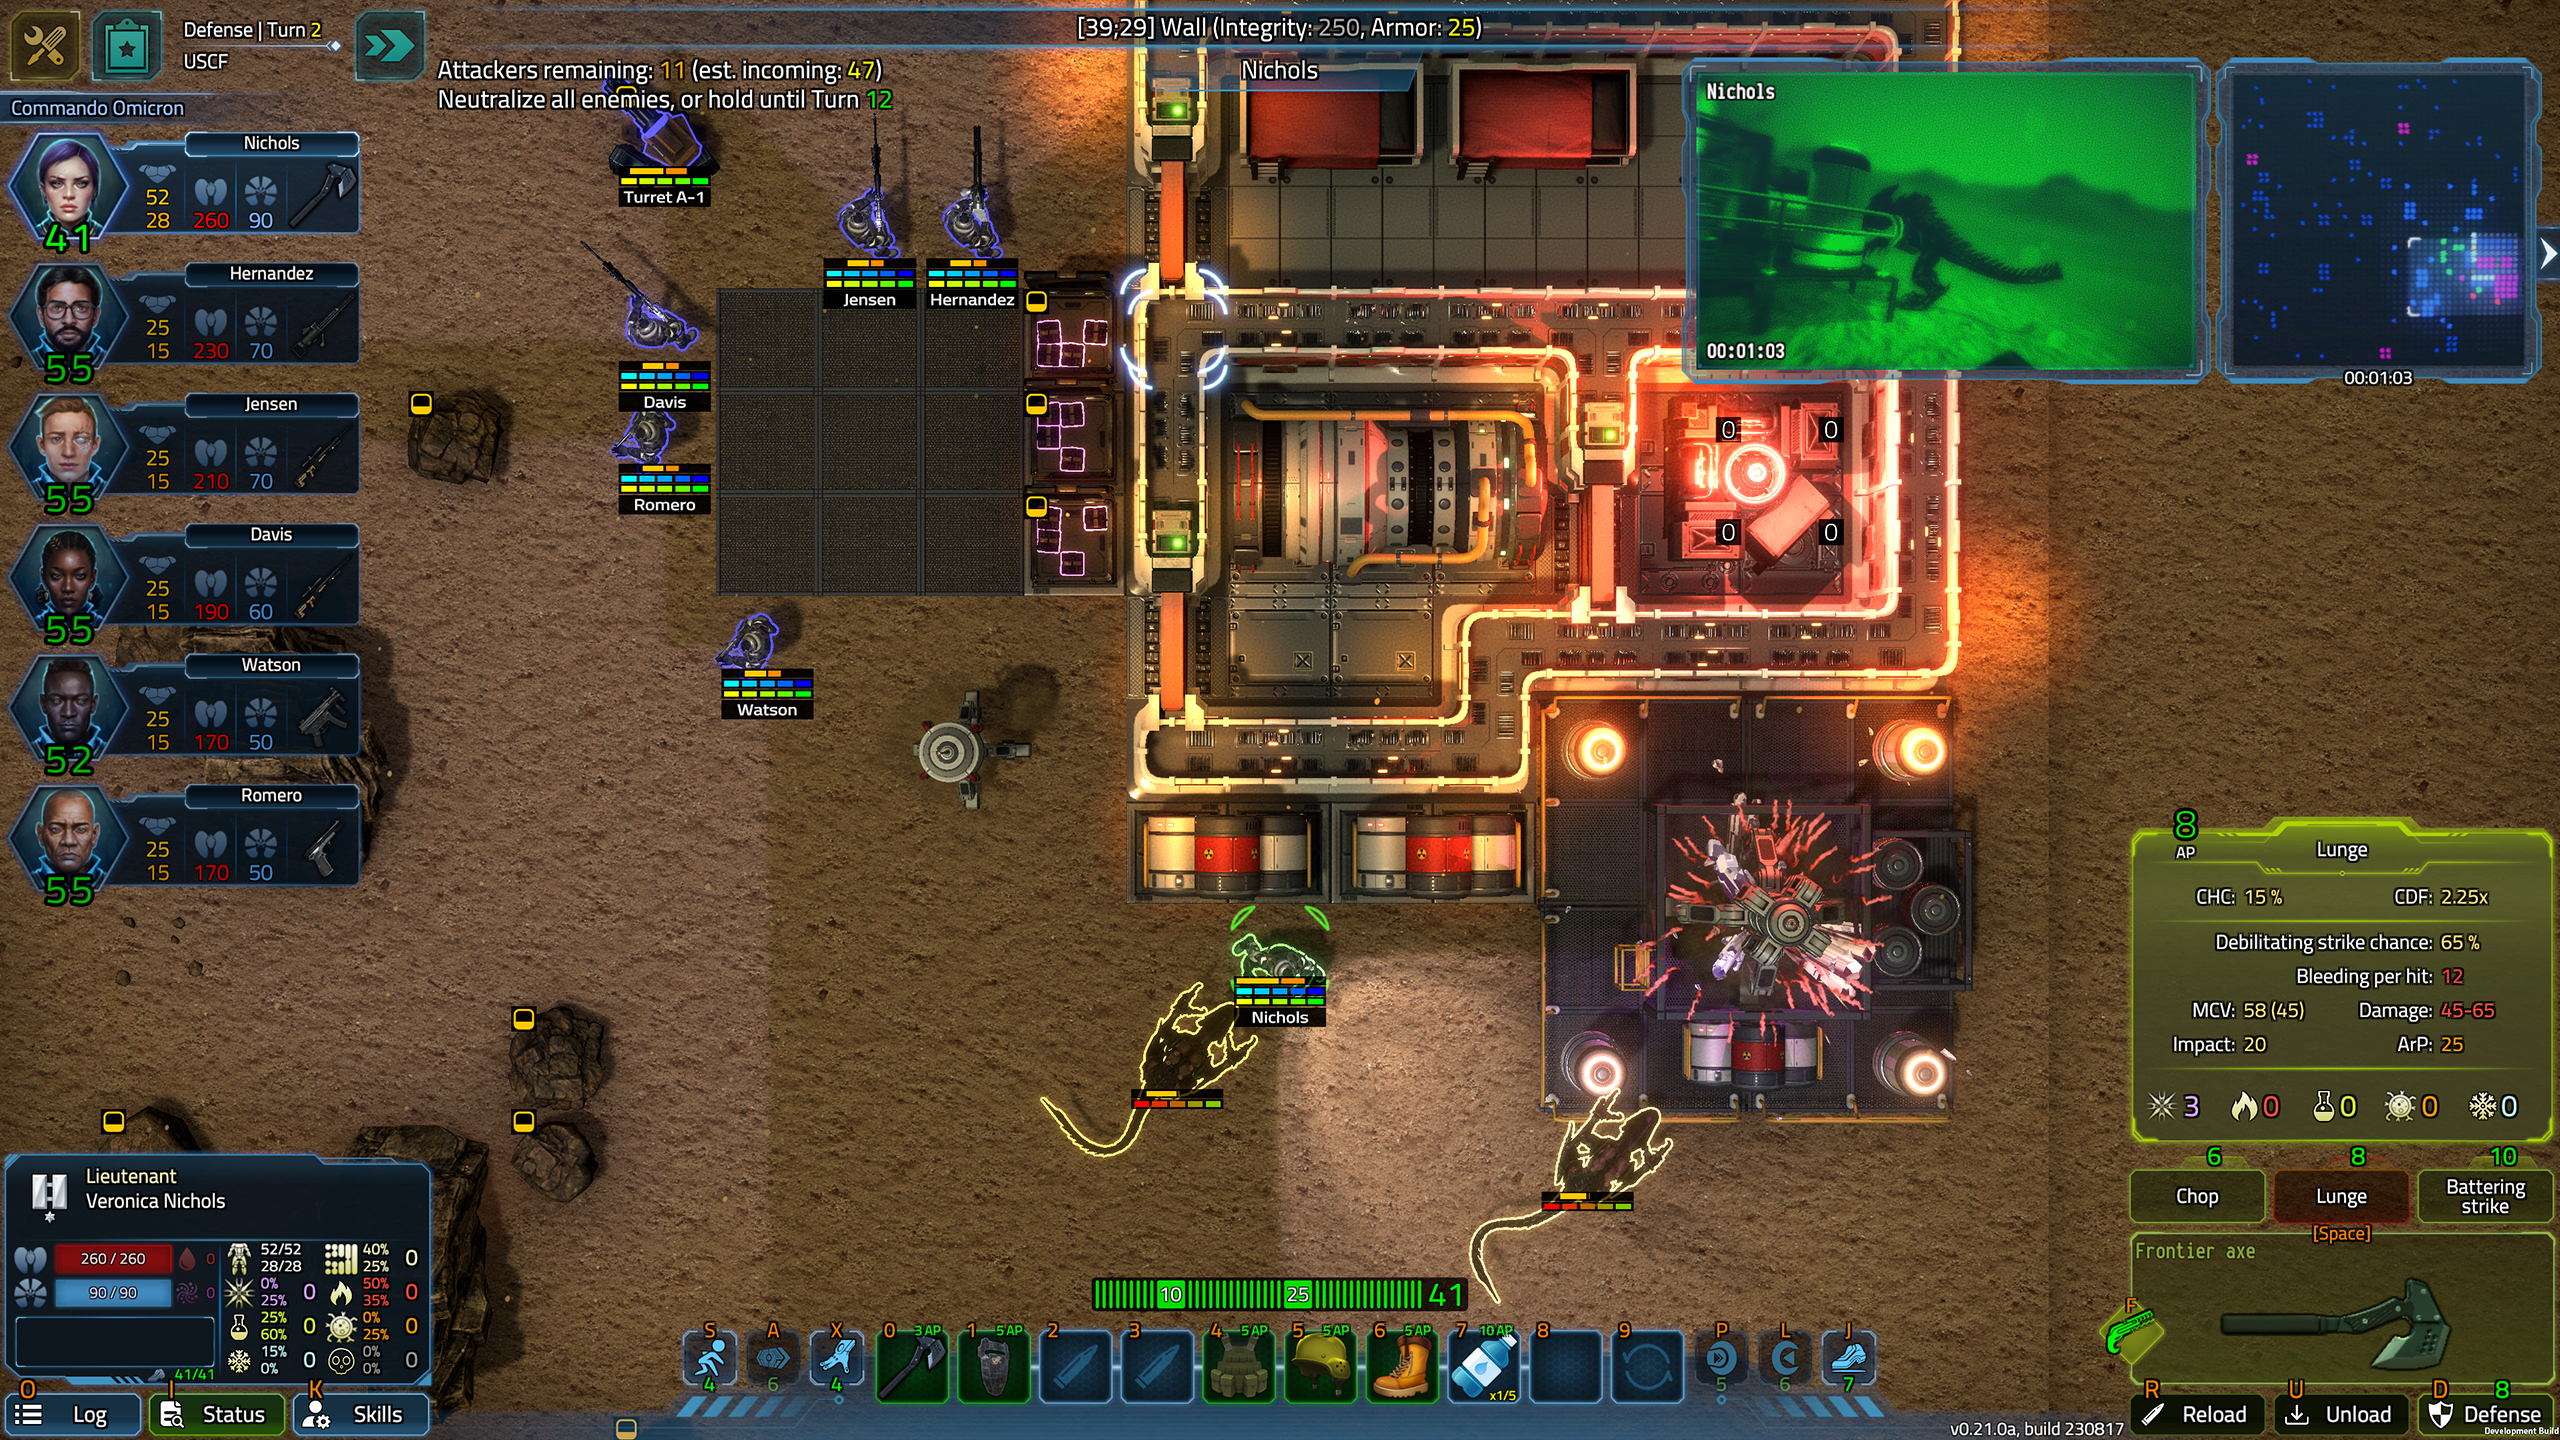
Aliens will foremostly try to kill your marines, but they can also get agitated by mining machines and will attack your precious equipment. As they will come from all edges of the map, it can be very challenging to protect a too-spread-out operation. (You have better chances if you mine out an area first, then relocate to another part of the map.)
You may also encounter weather conditions like strong winds or sandstorms. These have a negative effect on movement AP cost and ranged accuracy; a sandstorm also lowers visibility range, and decays armor if your marines are caught in the open (i.e. not in a room). Based on the time of the day the Wave takes place, visibility can be further hindered (especially at night if you don't have lights).
Constructing rooms
The concept of a functional room is very important, as most machines you need for success can only be placed in such a room. The requirements for a functional room are:
- Complete perimeter walls. If a wall gets destroyed during the Defense Phase, the room will cease to be “functional”. You can easily restore its status by constructing a new piece of wall.
- Complete flooring in the inside area.
- At least one door. The door doesn't need to be closed or even powered at all.
Once a new room is functional, it will get the “unassigned” designation, which means it's now a functional empty room that you can place any machine in. When you install a machine that requires a specific room type, an unassigned room will be automatically converted to that type; if you remove all such machines from a room, it will automatically revert to being unassigned. Once a room has an assigned type, only machines of that type (or objects that don't have a room type requirement) can be placed in it.
Installing mining equipment
Your two options for mining raw materials are Harvesters and Subsurface drills.
Harvesters can be only placed on deothonit outcroppings, and require a whopping 30 MW of power. They are loud, draw a lot of attention, and their size makes them easy targets for aliens. On the other hand, they have a steady 2,000 materials/Wave yield through multiple waves, and very often it's easier to set up a base near — or even around! — them.
Subsurface drills are small machines that you need to install over rich deothonit veins. You don't want to place them too close to each other, as they will compete for materials in that case, reducing their overall yield. Since they will be scattered out in the open, it's harder to provide them power (you can use the smaller generators locally) and can be also trickier to defend. A well-placed drill can yield around 1,500 minerals for a few Waves, so don't underestimate them — to hit more than 10,000 units mined, you'll definitely need them!
There are other means to increase the material yield. Once there is some raw material production via Harvesters or Drills, you can also make use of the following equipment:
- Deothonit refinery: placed in a Mining room with a hefty power requirement of 15 MW, they increase material yield by +10% each (based on raw material yield.)
- Deothonit container: easy to place with no serious requirements, these increase yield by +3% each, but only if at least one refinery is active! They are highly volatile, though, so you'd better protect them, and be extra careful when fighting in their vicinity.
- Data sequence optimizer: these high-tech machines placed in a Science room can really boost income if the raw yield is high enough — an active refinery is a prerequisite, though.
→ Next: Skills
← Previous: Tactics