Step-by-Step Tutorial
This picture-aided tutorial will help you learn the basics of USC in practice. For additional information and details, you may always consult the other sections of the Game Guide!
1. Setting up a Single Mission
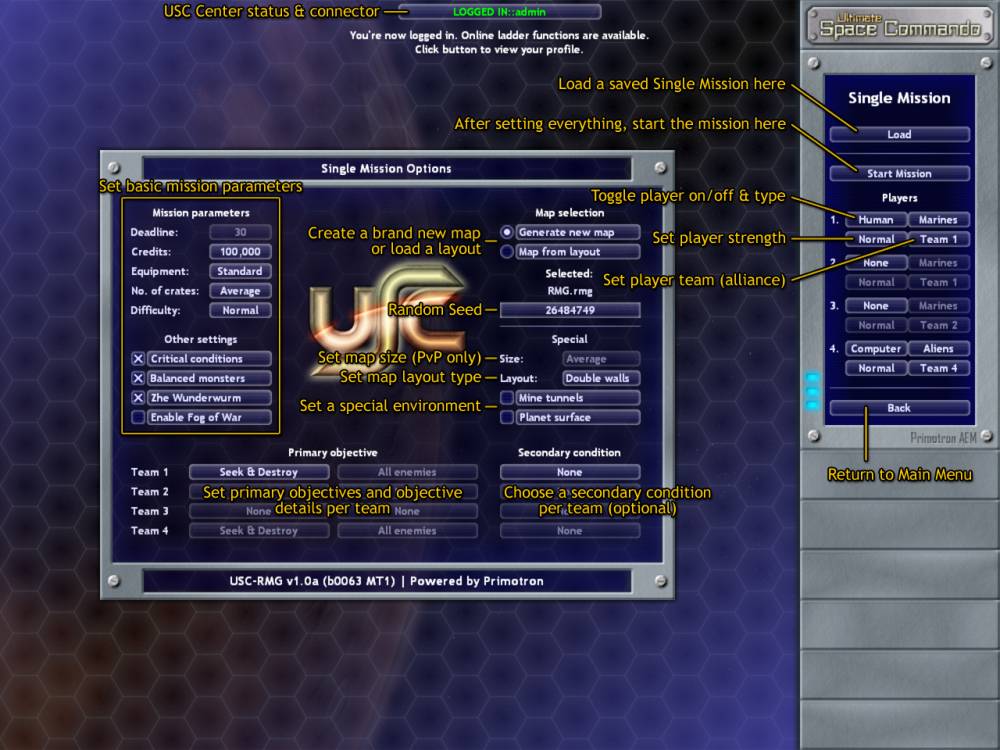
1.1 Choose “Single Mission” in the Main Menu.
1.2. On the panel to the right (replacing Main Menu) you can set up the players and teams for the mission. Click None, Human or Computer to add/remove a player or to switch player type (option toggles). As for the current version, human players are always USC and the computer is Aliens. Note that Player #1 must be human. Player #4 must be in-game, but you can switch it to human if you want a 1-on-1 PvP. Set the players' team by clicking the Team #? button next to them. For now, a team may only consist of 1 or 2 players (squads). As you toggle players and teams, the objective controls on the left will change, see later. You may additionally set player strength/handicap by clicking the Weak / Normal (default) / Strong / Deadly buttons (option toggles). If you choose a human player to be stronger, its units will have more Skill Points but will get less score. If you set Aliens stronger, they will grow in numbers, but you'll get more score for defeating them.
1.3. Set basic mission parameters in the top left corner of the “Single Mission Options” window. The tooltip texts there will provide detailed information about the settings. You should leave everything at default for your first play.
1.4. Set map parameters on the right side of the window. You can have the Random Map Generator make a brand new map, or you can load a Layout (map elements can still be random based on layout strictness). For a new map, you may specify a custom random seed (a number of any size). The same random seed will result in the exact same map PROVIDED all other settings are identical. You can set the map size< for PvP games, the map composition for all games, and you can choose a standard (no checks), mines or outdoors environment.
1.5. For the active teams (teams with at least 1 player, naturally), you can set the mission objectives and secondary conditions by clicking on the enabled buttons (options toggle). Teams with Aliens only always have the Seek & Destroy – All enemies objective.
1.6. When you're ready, click “Start Mission” in the top right corner of the screen.
1.7. Note: saved Single Missions can be resumed from this same screen: you only need to use the “Load” button, all the other settings are just for creating a new game.
2. Creating a squad
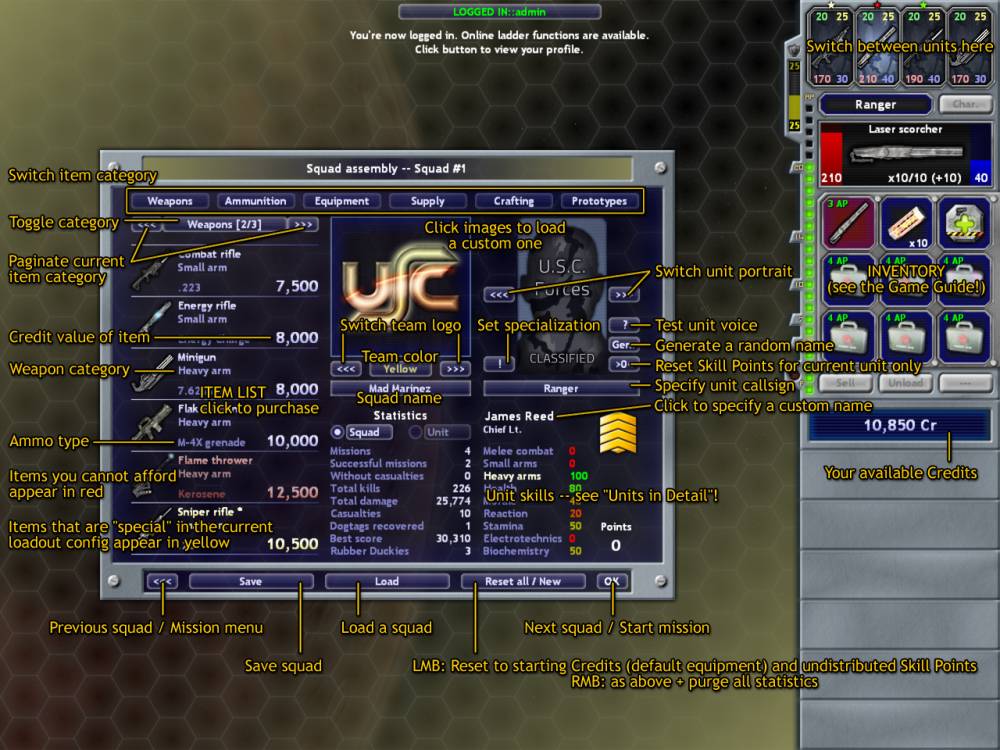
2.1. After starting the mission on the previous screen, Squad assembly will appear.
2.2. You can create as many squads as you want, but once you've come up with a fairly good basic setup and done your customizations, it's very recommended to save your squad by pressing “Save” on the bottom bar and specifying a squad filename. Then you can use this squad for other missions, achieving squad progress. (If you don't save your squad or aren't using an existing one, your progress won't be saved.) To use an existing squad, just click “Load” and select the file. You can save a squad with different filenames, but only the most recent save will store the progress you achieve in your next mission. Generally, you should only use one squad file and maybe another one for occasional backuping or “documenting”. You can always change your squad loadout and even the unit skills without losing squad progress! However, you can only deploy a squad one instance per mission. For 2 or 3 squad missions, you'll need multiple unique squads! Squad progress in Single Mission mode means the crafting materials, prototypes and statistics. Units don't advance or get promoted in this mode. But via crafting, you can achieve quite good development and become strong enough to storm Extreme and ULTIMATE difficulties!
2.3. Assembling a squad is a complex task. You have to distribute your units' skill points (e.g. train them) and buy (and later also craft) the weapons and equipment according to your units' abilities and your chosen tactics. Your main resource is your Credits. You have to spend it wisely to have both enough firepower and survivability.
2.4. It is a common practice to buy weapons and ammo first, and assign the respective combat skill points (melee, small arms, or heavy arms). A skill level of 80-100% is absolutely recommended in Single Missions. When browsing weapons, watch out for the category (melee, small or heavy) and the type of ammo it uses. This information is shown in the weapon list. You can also find ALL data about weapons and ammo in the Game Guide. It is advised to only have one weapon per unit. See the Weapons section for more detailed information. Always buy enough ammo for all your units! You should have at least 10x as much ammo as a weapon's single ammo capacity.
2.5. You can toggle the item category by clicking on the item category buttons at the top of the main window. Browse item pages by clicking the arrow buttons next to the category name over the item list. Consult the Items section for detailed information on available items. On using the inventory, see Inventory.
2.6. Skill points are assigned by left-clicking on the respective skill's name. Consult Units in Detail for detailed information on this.
2.7. Customization. You can change the squad's logo by pressing the arrow buttons below the logo in the center, or load a custom 192×192 pixels .png from the “data_user/custom_logos” directory. You can also change the squad's name and color. The same customization features apply to units. (To be continued.)
2.8. Press the small “OK” button to proceed (to the next player/squad, or the start of the mission). You'll be prompted to confirm your squad configuration. In this appearing dialog, you will also have an option to save the squad if you haven't done so already. The Map Generator will then create the mission for you. This should only take 5-10 seconds tops.
3. Basic in-game controls
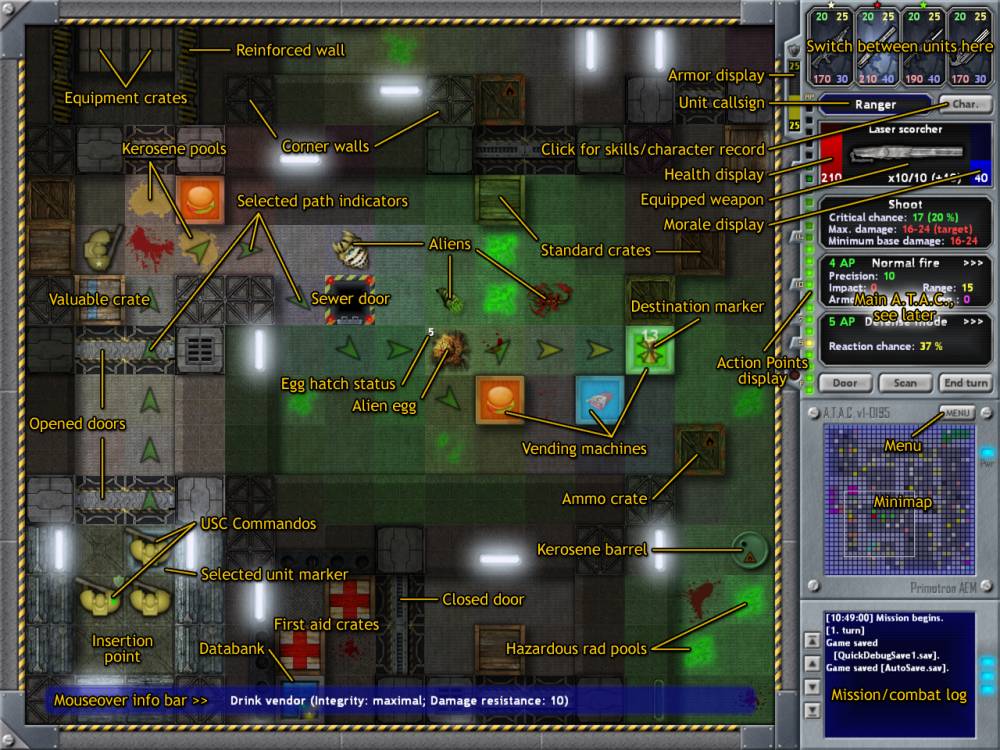
3.1. Every involved squad begins the mission at its insertion point, a smaller room with reinforced walls. This area has no other “special attributes”, except that you have to return the data disc here in “Get data” missions. Your units are automatically deployed following rank order, the two top-ranking soldiers standing in front and the others behind them.
3.2. The game interface consists of two main areas, the tactical view (the actual game area), and the A.T.A.C. (Advanced Tactical Assistance Computer) on the right, where you can access character data, inventory, combat options, the minimap, etc. When the mission begins, you have no units selected, and thus the A.T.A.C. shows general information about the mission: objective status, deadline, and such.
3.3. To perform any action, you have to select a unit. This is done by either left-clicking on a unit on the tactical view or clicking its portrait at the top right corner. You may also use the keys 1-4 or F1-F4. You can switch to any of your units at any time, but there's always only one unit selected. The A.T.A.C. area below the portraits always shows info about and options for the currently selected unit.
3.4. You can move your selected unit by left-clicking on the desired target location on the tactical view. Every grid of movement costs 1 Action Pont. Available Action Points are displayed as a column of green lights on the right, and also as green numbers on all four unit portraits. If you click a grid adjacent to your unit, it will move instantly, otherwise, the first click will only display a designated path, which you can confirm by clicking again on the target (marked by a cross by then). A number there shows how many Action Points will remain after the movement. You can read a lot more about movement here.
3.5. Units will always face the last direction they were moving to. To change this, right-click anywhere in the direction you want your unit to face, or use the numeric keyboard numbers, where “5” represents your unit. Turning does not cost any APs. Your unit's facing only affects its line of sight, not its defense or armor in any way.
3.6. To interact with a map element (e.g. open a door, pick up ammo from an ammo crate, kerosene from a barrel, close a sewer door, etc.), simply left-click on it. If you're not standing next to it, a path will be designated just like when you want to move. To perform interaction, you need the sufficient Action Points! A hovering tooltip will always tell you how many APs you need, but only when you're next to the object. As you hover the mouse over map elements, the info bar will also appear at the bottom, showing data about the object or unit.
3.7. To access a unit's skills and records, click the “Char.” button on the A.T.A.C. below the portraits. Close it by clicking the button again.
3.8. To access a unit's inventory, click the image of the current weapon. Close the inventory by clicking it again. On how to use the inventory, consult the detailed Inventory section here.
3.9. Scroll the view by moving the mouse cursor to the screen's edges, by pressing one of the four arrow keys on the keyboard, or by clicking anywhere on the minimap to quickly warp the view to that location.
3.10. You can move various map elements (crates, barrels, machines) by standing next to them, facing them, and clicking either of the “Push” or “Pull” buttons that will replace “Door” and “Scan” temporarily. If the way is blocked, you cannot move the object, of course.
3.11. Additional controls are explained in detail in the Controls section. Combat controls will be explained below shortly.
3.12. When all your units are out of Action Points, or you just want to end the turn for any other reason, click the “End turn” button.
3.13. Invoke the In-game Menu by clicking the “Menu” button on the minimap's upper panel, or by pressing [ESC]. Here you can save the game or load one, access miscellaneous A.T.A.C. options, or exit to the Main Menu.
4. Combat
4.1. Combat is generally performed by selecting (activating) an attack mode, and then a target in the tactical view. Every weapon has at least one weapon mode, and each weapon mode has at least one attack mode. Attack modes tied to a specific weapon mode share ammo type and Critical Threshold. All other properties of attack modes may vary. The A.T.A.C. always shows the most vital information.
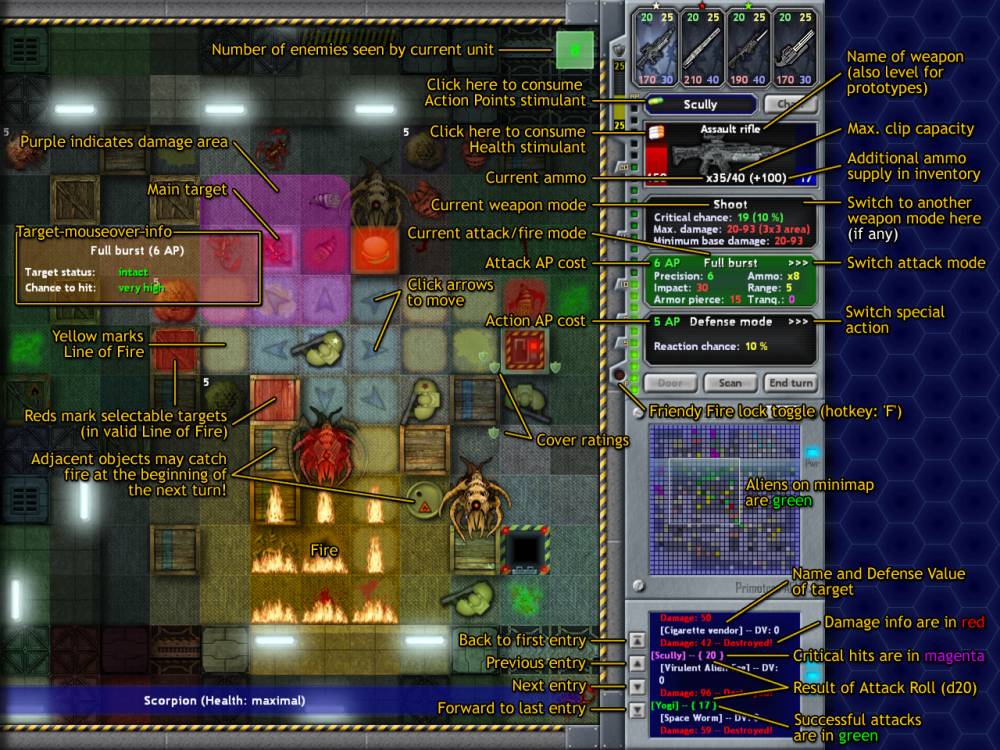
4.2. Below the icon of the current weapon, there are three main areas, showing data. The top one displays info about the current weapon mode, and damage info about the current attack mode. If the weapon has more than one weapon mode, you can switch mode by either left or right-clicking anywhere in the top display area, or by pressing [CTRL]. On the image above, the rifle has only one weapon mode, “Shoot”, that's why you don't see a > > > icon in the top right corner.
4.3. The middle display area shows the currently selected attack mode (in the picture, “Full burst”). A > > > icon in the top right corner indicates that there are more available attack modes. You can switch attack mode by left-clicking anywhere in the area, or by pressing [SHIFT]. But, having an attack mode as current or selected doesn't automatically mean you're ready to attack. You have to ready the weapon. This can be done very simply, by right-clicking in the area or by pressing [SPACE]. When the attack mode is thus activated, the area will have a green background and on the tactical view, the line of fire/target indicators will be visible (see picture).
4.4. When the attack mode is active, hover the cursor above any valid target marked by a reddish overlay on the tactical view to see basic targeting info: the status of the target and hit probability. A purple area will also appear to show the damage area (note that this area info will not take natural covers into account, e.g. if a target is behind a wall it won't be affected). If you're ready to attack, left-click on the target, and the attack will commence.
4.5. You will either hit or miss, based on many factors, see the Combat section for a lot of details. If you miss with a ranged attack, a random nearby unit or object may get hit instead. If you hit, you may damage the target. The damage done will be displayed in floating messages and will be registered in the combat log. Most attacks will do damage to Health if they get through the armor (red text). Armor-piercing attacks may also degrade the target's armor (yellow), while attacks with a high impact force may knock back the target and/or cause Action Points loss (for the next turn; green). Many attacks will also cause tranquilization (magenta).
4.6. Most attack modes use ammo. If there's not enough ammo left in the clip, you'll have to reload the weapon in order to use that attack mode. This can be either done by pressing [R], by selecting the “Reload” option in the third (bottom) display area (instead of Defense mode) and activating it, by opening the inventory and placing the ammo in the current weapon, or–for your ease!–by simply re-activating the attack mode, which will automatically reload the weapon if there's enough ammo AND you have enough Action Points (the attack AP cost in this case will be displayed in magenta and will include the reload AP cost).
4.7. As different attack modes use a different amount of ammo, keep in mind that any damage bonus a special ammo may have is taken into account per ammo used by that attack mode! So attacks with a high ammo consumption benefit more!
4.8. While the attack mode is active, you may also move–one step at a time–by clicking on the grids marked with the blueish arrow icons. Selecting a farther movement destination will deactivate the attack mode.
4.9. Deactive the current attack mode exactly the same way it has been activated. While it is active, you can still switch attack mode without deactivating the weapon.
4.10. One last key element to good tactics is the use of Defense mode. It means reserving the current Action Points for either blocking attacks (melee defense mode) in the enemy's turn, or for taking “opportunity shots” when the enemy moves (ranged defense mode). Defense mode always lasts until the next turn. To enter defense mode, a unit must have at least 5 Action Points and a Morale of 20! For melee weapons, any surplus APs will mean more Defense Rating. For ranged weapons, the amount of Action Points reserved for defense mode will be equal to the APs that can be spent on opportunity attacks, e.g. entering defense mode with 10 APs and an attack mode of 3 APs will mean that the unit can fire three times during its defense. It is REALLY STRONGLY ADVISED to always have a unit with a melee capable weapon and use it in melee defense mode to block/control alien swarm attempts, protecting the other units. Activate defense mode by right-clicking the bottom data area or by pressing [D].
4.11. This concludes the very basics of combat in USC. Refer to the other parts of the Game Guide (especially Combat) for details!
5. Special actions
5.1. Unloading a weapon. Sometimes you may want/need to completely unload your weapon (before selling, for example). You can either choose the “Unload” option in the third ATAC display area or select the weapon in your inventory and then click the “Unload” button. Unloading requires loading/2 APs.
5.2. Every unit has a built-in scanner that can be used to reveal nearby, otherwise unseen units (and if Fog of War is enabled, structures) in a 5-grid base radius. This costs 3 Action Points and can be performed anytime by pressing the “Scan” button on the main ATAC panel or the key [S]. The scanner will not work if you're facing a moveable object. Beware, scan-revealing alien eggs will “disturb” them and start their hatching process. Use a scanner booster to enhance the range of the scanner and get rid of this “side-effect”. Cloaked enemy units (in PvP) can also only be revealed by a boosted scanner.
5.3. Many map elements, such as crates, barrels, vending machines, and databanks can be moved–either pulled or pushed–if there's enough space. To move an object, you must face it. Then the “Pull” and “Push” buttons will replace “Lights” and “Scan” on the ATAC. Moving an object costs 3 Action Points, with the exception of pushing it while running, which may be 2 or 1 depending on unit speed. These objects can be used to build defenses, block passages, build better covers.
5.4. Some objects can be interacted with: vending machines, special crates, barrels, databanks, door locks, switches, sewer doors, etc. This is done by simply left-clicking on them as a movement destination. You'll need the required amount of APs, of course.
5.5. Items in your inventory also often need to be used/activated to fulfil their purpose. Read the Inventory section of the Game Guide for complete instructions on this. Medikits, grenades, armor mods, weapon upgrades, and many other special stuff need this attention.
5.6. You can toggle the unit's headlights on/off by pressing the “Lights” button on ATAC or the key [L]. This can be mostly useful in PvP.
5.7. You can harvest crafting materials by destroying crates (standard crates may drop screws, blue crates may also drop screwdrivers and wire cutters), crystals, and salvaging databanks. The model RD-1 Rubber Ducky is also a very important crafting material, it can be obtained from equipment crates by luck and by killing zhe Wunderwurmz (apparently, they're attracted to the duckies' cute appearance and tend to chew on them). Crafting materials can be then used to craft special equipment and prototype weapons off-budget, and is thus very important if you want to move onto higher difficulty levels (and in the Campaign, of course). For further info, see the Crafting section!
5.8. Door locks often control the entrance of special rooms. Unless you break through the door or have a circuit cracker in your inventory, you'll have to manually override these. Information about this is found here.
6. Mission evaluation
6.1. In the “Single Mission” mode (and the current version of USC), only successful PvE missions (one or two squads in alliance against one or two alien teams) are evaluated, that is, can receive score and make it to the Hall of Fame. Only successful missions add the collected crafting materials to the team's resources!
6.2. You'll get a mission score based on map layout, player strength, and main mission difficulty settings AND your general performance (enemies killed, units lost, time taken to complete the mission, etc.).
6.3. You'll also get a merit score (and possibly a merit) based on the above and many other factors.
6.4. It is possible to have a high mission score and a low merit score, or vice versa. While mission score generally measures your combat skills during the action, merit score takes humane factors more into account.
NOTE: as development continues, we plan to add more sophisticated and varied statistics and benchmarks to the game.
← Previous: Weapons
→ Next: The Squad


